• Skip to main content
  • Skip to primary sidebar
  • About
    • About Art Class Curator
    • Contact
    • Speaking
    • Media & Press
    • Programs for Schools
  • Blog
  • Podcast
  • Shop
  • Join
  • Member Login

Art Class Curator

Hands-on and Minds-curious Art Learning

  • Art & Artists
  • Art Connection Activities
  • Art Teacher Tips
  • Elements & Principles
  • Downloads & Resources
Home
  • About
    • About Art Class Curator
    • Contact
    • Speaking
    • Media & Press
    • Programs for Schools
  • Blog
    • Art & Artists
    • Elements & Principles
    • Art Connection Activities
    • Art Teacher Tips
    • Downloads & Resources
  • Book
  • Podcast
  • Shop
  • Join
  • Member Login

All Posts from Art Curator for Kids

May 18, 2017 1 Comment

7 Amazing Portraits Using Non-Traditional Art Materials

7 Amazing Portraits Using Non-Traditional Materials - PIN

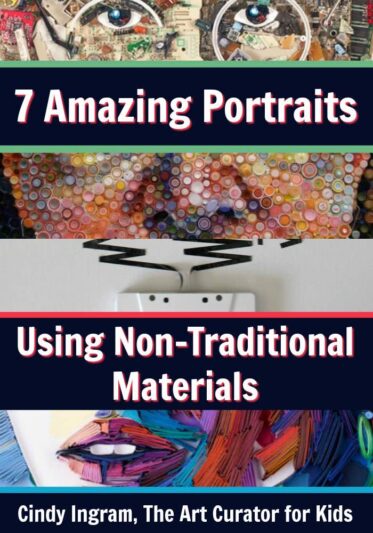
If you follow me on Facebook, you know I love My Modern Met, a website that shares creativity, science, and art news and inspiration. Recently, I shared a post about some amazing quilled portraits that made me think about what other portraits I could find made out of non traditional art materials.

7 Amazing Portraits Using Non Traditional art Materials - PIN

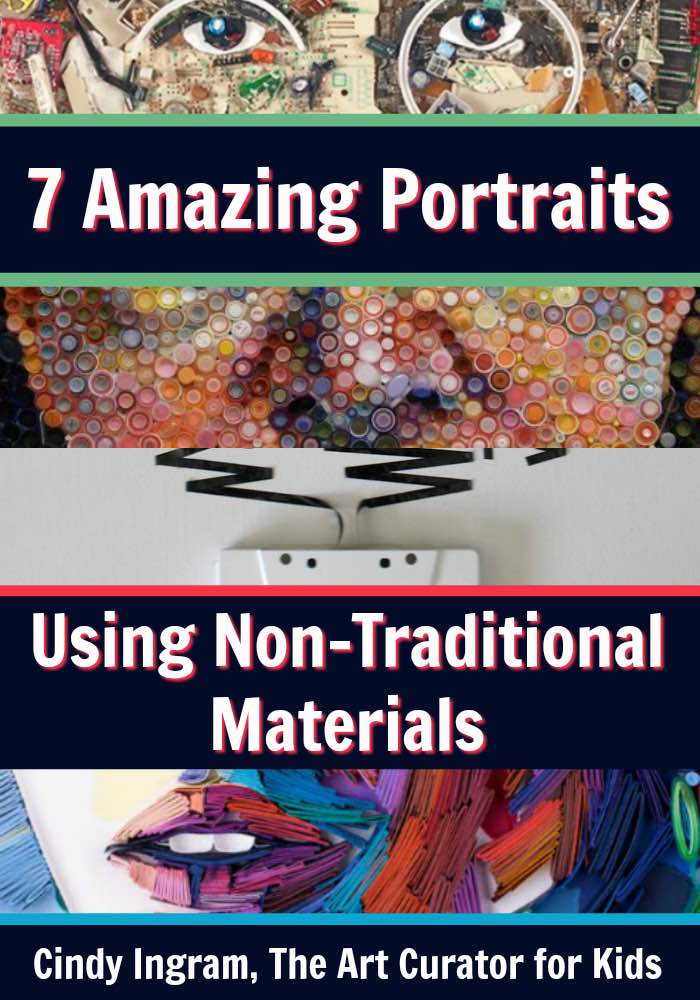
Hopefully these non-traditional artworks will inspire you and your students to think beyond the paintbrush and try out some new techniques. To help you explore these artworks further, download our free worksheet bundle designed to work with any work of art!
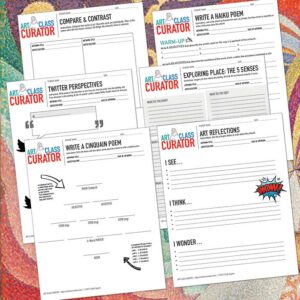
Free Worksheets!

Art Appreciation Worksheets

In this free bundle of art worksheets, you receive six ready-to-use art worksheets with looking activities designed to work with almost any work of art.

Download

Free Worksheets!

Art Appreciation Worksheets

In this free bundle of art worksheets, you receive six ready-to-use art worksheets with looking activities designed to work with almost any work of art.

Quilled Portraits

non traditional media

Yulia Brodskaya makes these amazingly colorful and detailed portraits using rolled and pinched paper. I did quilling with my students earlier in the year, and these artworks would be excellent to show in preparation for a project on quilling to help students really understand the possibilities. Learn more about her work here.

Embroidered Realism

weird artwork

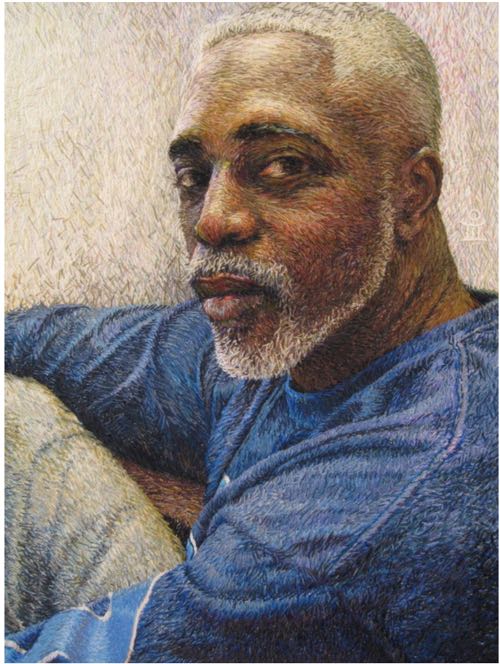
When I shared the quilling post on Facebook, a reader drew my attention to Mississipian artist Ruth Miller who embroiders larger than life, realistic portraits with wool tapestry yarn. Fiber arts are often considered to be a “lesser” art form, so this would be a great aesthetics discussion with your students about gender and elitism in art. Learn more about Ruth Miller’s art here.

Sunflower Seeds

non traditional media

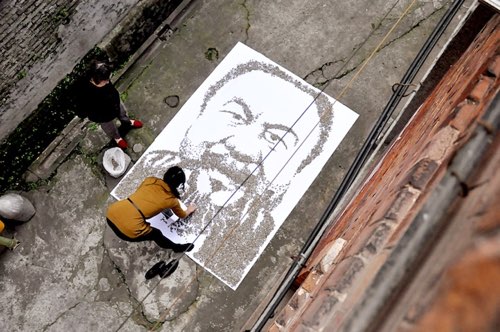
One of Ai Weiwei’s iconic works is his Sunflower Seeds. He handcrafted 100 million porcelain sunflower seeds and filled a gallery in the Tate Modern. Read more about that work here. As an homage to Ai Weiwei, artist Hong Yi made a portrait of Weiwei out of sunflower seeds. Love.

Bottle Caps

Portraits Made Using Non-Traditional Art Materials

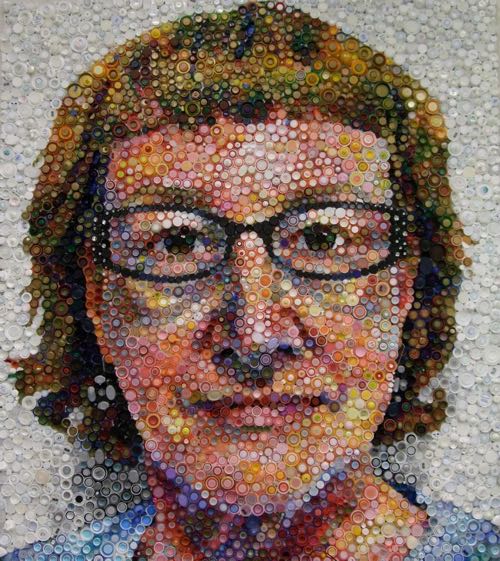
Artist Mary Ellen Croteau made a self-portrait out of bottle caps. I love this use of recycled art materials, and it is sure to inspire your students. Click over to Colossal to see some cool detail shots of the portrait.

Cassette Tapes 

Portraits Made Using Non-Traditional Media

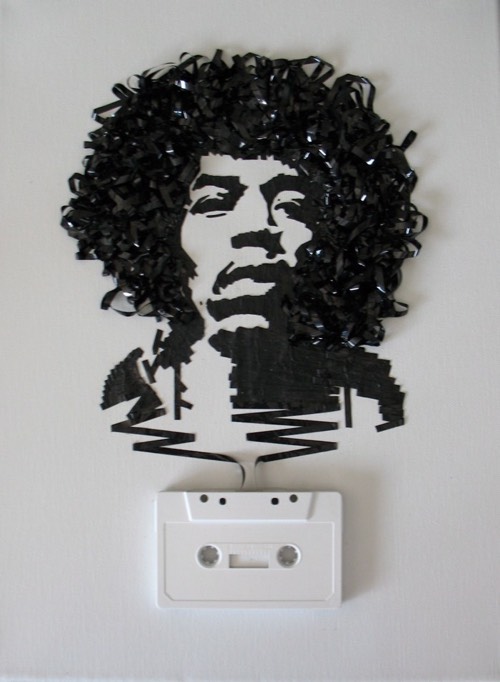
Media artist iri5‘s Ghost in the Machine series creates portraits of musicians using the cassette’s of their music. Brain Pickings says “The project is inspired by the philosophical sentiment that the body is but a package for the spirit.” This is an amazing connection between the media and the subject of the artwork. See more examples here.

Blood

Weird artwork

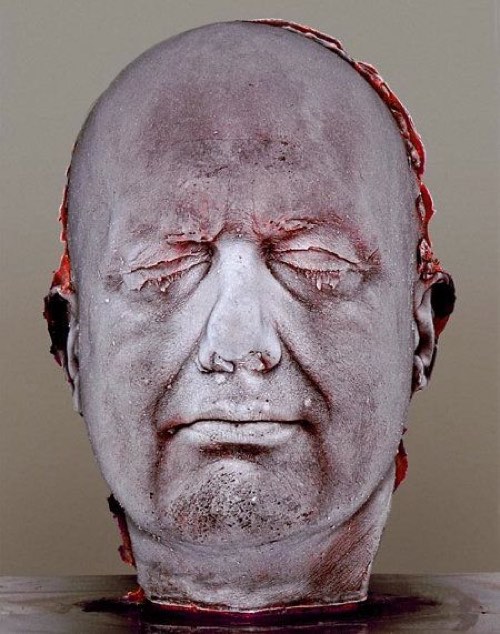
Okay, I apologize for including this one, because it is totally creeping me out, but Marc Quinn casts a sculpture of himself every 5 years in (his own) frozen blood. It captures our fleeting existence, the aging process, and the delicateness of life (keeping it frozen and unmelted makes it high maintenance).

Trash, Food, and Everything In Between

Portraits Made Using Non Traditional Art Materials

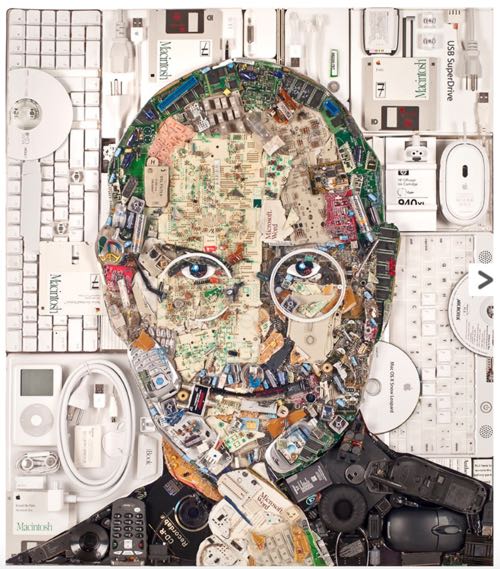
Pop Artist Jason Mecier is the master of portraits out of wacky art materials. From a portrait of Kevin Bacon made out of…you guessed it…bacon to Steve Jobs made out of computer parts to Rupaul made out of items from the beauty aisle, this guy has done it all. There are probably over a hundred artworks on his website to enjoy, so head over there to experience the fun.

Did you do an art project inspired by any of these works of non traditional art? I’d love to hear about it! Drop me a line or connect with me on Facebook to share your results!

Filed Under: Art and Artists
Tagged With: ai weiwei, hong yi, jason mecier, marc quinn, mary ellen croteau, ruth miller, yulia brodskaya


May 10, 2017 2 Comments

Chinese Bronze Vessels with Abstract Zoomorphic Designs: Learning Activities and PowerPoint

The Art Curator for Kids-Chinese Bronze Age Vessels Lesson Plan Pin

Have you ever been to a museum in a particularly boring exhibit of random dishes and watched people look at the artwork and wondering what in the world they find so interesting about something you think is so boring? I have to admit I’ve been there–watching people looking intrigued wondering if they are faking it. As I continue my journey of exploring more art from around the world (watch last week’s Facebook Live for more information about this journey), this is happening less and less for me.

In today’s post, we’re headed to Bronze Age China, from about 1700 BCE to about 200 BCE, where we will be inspired by some pretty awesome bronze vessels. They may not look that exciting at first glance, but the more you look at them, the more cool stuff you will find.

Prehistoric Chinese Art

To give you some context, I’m going to share with you a little bit of information about the artworks that came before so that you can get a better understanding of Ancient Chinese art as a whole. The earliest art from the Neolithic Period in China was clay pots and pottery.

Met Museum

These clay pots from the Neolithic time period had animal designs and human faces. They eventually ended up making those animals into more symmetrical, abstract shapes, and we’re going to see that transfer over to the Bronze Age art we will look at below.

Met Museum

Another important art form from Ancient China that dates all the way back to 3,800 BCE is jade sculpture and ornaments. Out of jade, they made cylinders, discs, pendants, jewelry, hair ornaments, plaques, and sculpture.

Photo Credit: Immanuel Giel

Jade in China comes from a mountaintop. When it falls down into the river it breaks open and reveals this beautiful green underneath. It’s become a signifier of Chinese art, even still today.

Back in ancient times, the rulers and the noble people wore the jade in their tombs which showed the importance and the value of these jade ornaments. They also believed that the jade could protect your body from decaying in the tomb and that would help you on in the afterlife.

Chinese Dynasties

When studying Chinese art  history, it’s important to understand their social structure and their governmental structure, because that is what has remained consistent over a really long period of time. China has, for the most part, always been run by dynasties. A dynasty is a group of kings, so one dynasty would be one guy who starts the dynasty as the first ruler of that dynasty. He has a son which then becomes emperor. That boy would have a son. Then that man has a son. Then that would continue until the end when there would be no sons left. Then a new dynasty would emerge as the ruler. Most of Chinese history has been run in these dynasties. A dynasty can run anywhere from ten years to several hundred years depending on the longevity of that group.

Get the Full Lesson!

This Lesson is in The Curated Connections Library!

Find the full lesson from this post along with hundreds of other art teaching resources and trainings in the Curated Connections Library. Click here for more information about how to join or enter your email below for a free SPARKworks lesson from the membership!

Join the List

Get the Full Lesson!

This Lesson is in The Curated Connections Library!

Find the full lesson from this post along with hundreds of other art teaching resources and trainings in the Curated Connections Library. Click here for more information about how to join or enter your email below for a free SPARKworks lesson from the membership!

Chinese Bronze Vessels

Scroll through this slideshow to see examples of Chinese Bronze Vessels.

[slideshow_deploy id=’10679′]

Function of Bronze Vessels

The Bronze Age begins at the end of the Shah dynasty and the beginning of the Shang dynasty. During the Bronze Age, in addition to tools and weaponry, we begin to see a bunch of bronze vessels from Ancient China.

Met Museum

These vessels are more than just to serve and store food. These vessels have a very sacred and spiritual purpose. An important person might own a bronze vessel, and they use that bronze vessel in rituals to celebrate and to honor his or her ancestors. Then, when that owner of that vessel passes on, the vessel then is included in the tomb of that important person.

Met Museum

There have been cases of over 200 pieces of bronze vessels in one royal tomb. Bronze vessels started out as a very ritualistic and spiritual thing and, as they became more common, they started to be used more for practical purposes and for aesthetic enjoyment as well.

There are a lot of different types of bronze vessels. Two types are the zun and the ding. A zun holds wine, and a ding is used to cook and store meat.

The larger the ding is–the more important and more powerful the person is who owned it.

Chinese Bronze Casting Process

These bronze vessels were created using a process called piece mold casting. Piece mold casting is kind of a longer and more complicated process that the more common lost wax casting. It’s more challenging of a process but it allows the artists  to create these really cool designs on the outside of their vessels.

With piece mold casting, they would make a model of what they wanted the vessel to look like at the end. Then, they would create a mold of it with clay along the outside. Once that clay mold was created, then they cut apart that mold into pieces and then put it back together before they poured the bronze in. If it was a vessel, they would have to put in some sort of cavity on the inside so that it would have the hole, and it wouldn’t be solid. It was harder to do than lost wax casting–more bulky and less fluid of a process. But once they had those pieces broken away, they could add in some more fine details and add the designs into the side of the vessel that they weren’t able to do with lost wax casting.

Photo by Jakub Halun

Chinese Bronze Zoomorphic Designs

There are a couple things that make these bronze vessels unique and fun to look at. The first is the designs on the outside of the vessels.

These designs, similar to the early pottery above, are zoomorphic designs, which means they are animal designs, but they are abstract. They’re really interesting and intricate, and you have to really look to find the animal hidden in the abstract designs. These animals took on a symbolic nature, and they represented stories and symbols. The qualities of these animals might transfer to the family or the ancestor of the person who owned the vessel. The vessels were either in a spouted shape, a round shape, or a square shape and often they would be in the shape of the animal itself, with more animal designs on the outside.

One of the most popular designs on the outside was called a taotie, which was a kind of a squished mythological animal. The taotie is like a mask. It doesn’t often include the body. If you imagine, if you take an animal from the front and squish it into the side of the surface. You’ve got the eyes and then the face and then the the rest of the features sort of coming out of the side as they get squished.

A taotie is like a monster on the side of this vessel, and he’s trying to get you. He’s trying to eat you and harm you, but he’s trapped.

Chinese Bronze Vessel Discussion Questions

Show a Chinese Bronze Vessel and ask the following questions.

  • What do you see?
  • Describe this artwork? Describe the lines, designs, etc.
  • What images can you find? What animals can you find?
  • Why do you you think these animals were included in the artwork?
  • What do you think these animals might symbolize? 
  • What do you think this was used for? What is the function of this artwork?

Learning Activities

Want to explore these artworks more with your students? Try these ideas.

  1. Print out pictures of different bronze vessels and have students practice finding and sketching the animal designs from the vessels.
  2. Give students a realistic photograph of an animal and have them try to make the animal abstract using the bronze vessels as inspiration.
  3. Have students take an animal, a mythological animal that they  create, or a person and squish them forward onto the paper. Make a two-dimensional, abstract design that’s symmetrical like the taotie is on the side of these vessels.
  4. Take pictures of students with their face squished into a pane of glass. Then, have them draw themselves from prints of the pictures.
  5. Make your own clay vessels in animal shapes. Carve animal design into the sides.
  6. Make a symmetry monster-style artwork inspired by the Chinese taotie.

Filed Under: Art and Artists


April 26, 2017 3 Comments

The Nudity Question: How to Deal with Nudity in Art Class

The Art Curator for Kids - Nudity in Art Education - PIN

Since starting my website in 2014, there’s one question I get the most, and that is “what do I do about showing nude artworks to my students?” Every time I try to write a post about this, I get major writer’s block, so I thought the best way to address it is to cover the nudity question in a Facebook Live.

The Art Curator for Kids - Nudity in Art Education - PIN

Not all of the Facebook live sessions will make their way onto the website (although all will be stored in the Resource Library), but this one is too important to leave out.

Here is the video from the live session on April 26, 2017 followed by an outline of my notes and resources from the session.

If for some reason the video doesn’t work for you, you can also watch it on YouTube.

The video goes into much more depth about the topic, but the basic points are covered below!

Why show nude artworks?

Our Western culture is filled with taboo about bodies. We are taught to view bodies as dirty, shameful, and imperfect. Nudity in art is almost always about the power and beauty of the human body. If we make a big deal of out showing nude works to our students, we feed that troublesome beast. We teach our kids that their bodies are something to be ashamed of and something to laugh at.

Bodies are not gross. They are not only for sexual purposes. Bodies are powerful and amazing. If you think about what a body is really capable of, it will really blow your mind. We should celebrate that.

The mantra of the session is “it’s only weird if you make it weird!”

Which grades should view nude artworks?

As an elementary teacher, I would rarely show artworks with nudity to my students (although as a former homeschool mom, I did show nude artworks to my young children with no issues). It’s simply not necessary for their curriculum and not worth the trouble if you can get around it. I think you can show nudity at that age using the strategies below, and I do believe they would benefit from these sorts of discussions early in their lives.

For middle and high, I do not shy away from nude artworks, especially when it comes to the curriculum. For example, if you are teaching about Ancient Greece and Rome, you must include nude artworks to cover the topic effectively. It’s an important part of art history. As long as your artwork selection is meaningful and chosen for academic purposes in the context of your curriculum, I think you are fine.

Strategies to Deal with Student Responses

  1. Shut it down. My best and most-frequent response is to just flat out shut down any comments by students. With the first giggle or statement, I say “No. We’re not going to do that today.” That’s it. Usually, that is enough to stop my students from going further. If they know they won’t get a rise out of me and they know they can’t perform for their classmates, it’s not worth it to keep it up.
  2. Educate them. Teach students why nudity is used in art. I bring in examples from Ancient Greece and Michelangelo’s morgue visits. I also tell them about my college drawing classes. I teach them that throughout history, bodies are not shameful things as they are in our culture today.
  3. Use the right terms. Talk to the students about the terms naked vs nude. If you use the term nude figure instead of naked body, you are using more academic language, and students (and parents) will take that more seriously.
  4. Talk about censorship. Share articles from current events about censorship and lead a discussion with your students. We discussed this news story as an example.

Creating a Safe Classroom

Ultimately if you create a safe space in your classroom where students trust you and you trust them and if you have a positive rapport with your students, you will have less issues. In the Facebook live, I share one example of a student who was having some issues with the Hindu sculpture we were looking at in class. She could have gotten offended and gone to her parents or admin or something, but she felt safe and comfortable enough to pull me aside and discuss her reservations with me.

Next Week: Cultural Appropriation and Teaching Non-Western Cultures

This Tuesday, May 2, 2017, at 8pm CST, we’ll cover how to sensitively teach art from other cultures. Join me next week and every week on Facebook to talk about teaching and learning from works of art. Have a topic idea? Send it my way, and join my e-mail list for updates. See you on Tuesday on Art Class Curator Facebook Page (be sure to click like so the video pops up in your feed!)!

Mentioned on the Art Class Curator Podcast…

Filed Under: Art Teacher Tips


April 3, 2017 6 Comments

10 Fun Activities to Engage with Works of Art

The Art Curator for Kids - 10 Fun Activities to Engage with Works of Art

Do you want to look at artworks with your toddlers and preschoolers, but you think they are too young? They are not! Looking at art opens kids up to new cultures and ideas, helps them learn empathy, and develops creativity and critical thinking skills.

The Art Curator for Kids - 10 Fun Activities to Engage with Works of Art

Try some of these activities out with your little one in front of any artwork of your choosing to get him or her engaged with works of art.

10 Fun Activities to Enjoy Works of Art

Free PDF

10 Fun Activities to Engage with Art

Get active with art! Here are some of my favorite interactive art activities for kids and students of all ages!

Download

Free PDF

10 Fun Activities to Engage with Art

Get active with art! Here are some of my favorite interactive art activities for kids and students of all ages!

  1. Talk about it. This can be as simple as pointing out funny things, counting objects, or discussing shapes. (Try these artworks for a great place to start. And check out these tips and these for more suggestions.)
  2. Move! Put your bodies into the position of the characters, pantomime the actions, make up a dance, or play charades. (Check out this post for some great artworks for this activity!)
  3. Play “I spy.” One person choose something from the artwork and gives hints about it while the other people guess what it is. Or, check out this I spy art book series!
  4. Make a texture bag. Place a textured object that is similar to something in the artwork in a bag. Have the child reach into the bag, feel the texture, and describe it without looking at it.
  5. Make up a story about the artwork together. What happened before the scene in the art? What will happen next?
  6. Integrate your child’s toys. Use the artwork as the spark for some pretend play. Use blocks to build the scene or use toy characters to act out the story. Take the child’s lead.10 Fun Activities to Enjoy Works of Art-Draw
  7. Draw the artwork. Drawing the artwork makes the child spend more time looking at it. The more looking they do, the more they benefit from the experience.
  8. Practice description skills. Have the child describe the artwork to someone who has never seen it before. If old enough, have the second person draw the artwork based on the description of the child.
    10 Fun Activities to Enjoy Works of Art-Museum
  9. Visit an art museum and play. Did you know that most art museums offer special materials for families to use in the galleries? Ask at the front desk if they have any family guides or resources to use on your visit. These often include scavenger hunts, discussion guides, games, and/or books to read in front of artworks.
  10. Have a museum scavenger hunt. Before you go, print a small clip from the artwork or a picture of an item from the artwork. (Check out the museum’s website to find out what is on view). Then, have the kids look for their picture in the museum.

Try it out, don’t stress, and have fun!

Filed Under: Art Connection Activities
Tagged With: best of art class curator


March 23, 2017 10 Comments

Art, Horror, and The Sublime: Pablo Picasso’s Guernica

Art Class Curator Guernica Lesson

Inside: This Guernica lesson includes a free worksheet for exploring the symbolism in one of Picasso’s most famous artworks. 

On September 11, 2001, the world was glued to their television sets. We witnessed the repeated footage of planes slamming into the two towers and the crashing of the buildings to the ground killing thousands, footage of people jumping from great heights, and terrible views of anguished people covered in dust and ash.

More recently, the city of Aleppo in Syria was underside and videos emerged from citizens and reporters from the ground. I saw a teenage boy holding a dead baby while a women covered in ash wailed and spoke.

On a smaller scale, citizens across the country slow down their cars so as to get a better glimpse at horrific car accidents. Some morbid curiosity in us causes us to want to see these horrors and to not look away.

That’s how I felt recently when finally getting to see in person one of my favorite artworks.

Crying in Front of Art

My friends, family, and students all know that I have been desperate to see Pablo Picasso’s Guernica. It’s been number one on my art bucket list, and I have been plotting for years how to get myself to Spain just to see it. I finally got the chance last week when the amazing travel app Hopper (you need this app seriously, this is not sponsored. You just need the app.) put us at a 24-hour layover in Madrid on the way to Rome.

I said in my bucket list post that I would probably cry like a baby when I got to see this artwork for the first time, but I could never have predicted how I actually reacted to it. I’m going to try to explain my experience here for you as well as share below how I teach about this artwork in my classroom.

I’ve cried in front of artworks before. The Sistine Chapel ceiling and Raphael’s School of Athens wowed me to tears with their history and gravitas, Donatello’s Penitent Magdalene moved me with her stripped, raw expression, and Picasso’s Girl Before a Mirror punched me in the stomach and made me rethink the whole trajectory of my career.

Photo Credit: Sailko

Each artwork gave me tears for different reasons, and I expected Guernica to move me to tears simply because I was seeing something I loved dearly.

Instead I cried for the horrors of the world.

Pablo Picasso’s Guernica

The painting depicts the senseless bombing of the town of Guernica by Hitler in the Spanish Civil War. Pablo Picasso mainly painted things from his life–woman, children, still-life painting, etc. He rarely made political statements or painted stories. When the bombing of Guernica happened, Picasso was forced to take action (check out this amazing zen pencils comic about it here) and used his art to make a statement.

The pain in the painting is palpable in reproductions, but in person, you can’t escape it. It’s huge–11 ft 5 in (3.49 meters) tall and 25 ft 6 in (7.76 meters) wide. When I saw it, I was enveloped in the details of the painting and the pain it represents.

The more I looked, the more I saw the real events unfold in my head. I couldn’t separate the painting from the destruction and loss of life from the bombing. I saw the ash-covered woman from Allepo. I saw the World Trade Centers fall. And I ached for our pain-filled world.

What made the whole experience even worse was looking at the exhibition of Picasso’s sketches and plans for the painting.

The horror in this drawing alone won’t leave my head and will haunt me for years to come.

In the museum, there was a series of photographs that showed the progression of the painting. It was fascinating to me to see how Picasso added and subtracted imagery. Early in the progression, there seemed to be larger and more obvious symbols of hope. The man who in the final painting is sliced in half was made whole with his arm and fist shooting up in protest. These signs of strength and hope were dismantled and fractured to where they ended up almost gone.

What also struck me about the painting is how connected to the artist I felt. Picasso’s paintings to me usually are so perfect and precise. Even though they depict fractured faces and distorted figures, the colors are bold and solid and the lines clean. This painting lived and breathed in its imperfection. You could see the underpainting of previous drafts show through, and the paint drips and spatters added to the emotion of the piece.

I left the museum unable to look at any other art, because I felt vulnerable and full and like I had witnessed a terrible event. As predicted, I did cry in front of the painting, but the cry was an unexpected and stifled sob rather than the “moved to tears” happy cry that I expected.

The experience reminded me of Kant’s idea of The Sublime (which I’ve written about in the past). The sublime can be described as “a greatness beyond all possibility of calculation, measurement, or imitation.” That’s what this artwork was for me. It was sublime in its effectiveness and its subject matter. It’s a terrible and wonderful painting and a paradox of an experience that is hard to describe but one that I will hold with me forever in wonder.

Teaching Guernica

Last semester, my 7th graders and I spent a couple days unpacking this painting. Here are some learning activities you could use to introduce this artwork.

  • Memorization Drawing — I displayed Guernica on the screen and invited my students to study it for many minutes. I told them to memorize every aspect of it. I then traced the outline of the painting on the whiteboard (the whiteboard doubles as my projector space) and then turned off the projector. I asked students to tell me what they remembered about the painting as I drew in what they described. You could also have them work in groups to recreate the painting or have them write what they remember.
  • Drawing — Study Picasso’s sketches, and then have students practice drawings that communicate different emotions.

Download this free worksheet to prepare your students for the painting and its symbols. Picasso said that any symbols did not come from him, but it’s undeniable that symbolism exists in the painting. Have students consider what each element of the painting represents before leading any discussions or activities in this artwork.

Free Worksheet!

Symbolism in Guernica Worksheet

Use this free worksheet to help your students reflect on ‘Guernica’ and its symbols.

Download

Free Worksheet!

Symbolism in Guernica Worksheet

Use this free worksheet to help your students reflect on ‘Guernica’ and its symbols.

Filed Under: Art and Artists
Tagged With: pablo picasso


March 6, 2017 2 Comments

Stamp of Approval: Assessing Student Participation

I’ve taught students online and in classrooms of all kinds, and measuring student engagement is different every single time. With each group of students, new strategies are needed to figure out ways to assess students and their participation in class–from the eager students who wants to answer every question to the quiet ones who may or may not be actively engaged in the lesson. How do you tell the difference between the quiet and engaged and quiet and daydreaming when grading participation?

We know that learners of every age make better connections when they are actively thinking and talking about our teaching material. We can make our class time more valuable by creating a system for how we want to interact with students – verbally and nonverbally – to show how their participation is expected. The ideal is for each student to take part in the class in ways that meet our goals but also reflect their own learning styles.

Participation doesn’t always mean how much they speak up in class – it can also be about having the right materials with them, completing in-class assignments, working collaboratively, or staying on task. It can be difficult to track this because different students participate in their own way.

Today I will share three classroom participation grading techniques that I’ve used and how they meet the above needs.

Please note, this post includes Amazon affiliate links. As an Amazon Associate I earn from qualifying purchases.

Stamp of Approval


When I first started teaching middle school, I asked a close friend of mine to share her tips and strategies for classroom management for that age. She told me about a system where each student gets a weekly page with a grid on it. Each day has two slots for participation, and the students leaves it on their desk in front of them as they work or participate in the lesson. They get stamps on their grid for excellent participation and an X or some other code for not working hard, talking, not paying attention, etc.

At the end of the week, students turn in their form for a participation grade. On the back, I had a spot where students could write what they learned in art that week which could cancel out some of their Xs if they showed they really did learn the material.

This is the classroom management system I used at the beginning of this school year for several months with great results.

stampers

If a student raised their hand to give an idea, I would walk over and reward their participation in the discussion with a stamp. That encourages other students who wouldn’t maybe raise their hand to raise their hand and share some of their thoughts when they see that other kids are getting rewarded. When we’re working on art projects, if I see someone’s working diligently, I’ll walk by and stamp. I do the same with the do-nows/bellringers. If I see that they’ve come in the classroom, they have all their supplies, they get right to work, they can get a stamp, too.

Now, if they are not doing what they’re supposed to do, if I’ve asked the class to be silent and they’re talking, I walk by and I put an X. It could be an X in a blank box, or I could mark off a stamp that they’ve already earned, if they’ve already earned 2 stamps for the day. They lose 1 of their stamps. Then, at the end of each week, I take that and grade it. There’s 10 spots. Each one is worth 10 points. A stamp is worth 10 points. An X is worth zero.

It’s a really awesome system that works great if try keep up with it. It provides documentation, visual reinforcement, and even middle schoolers find getting a stamp fun. They are still kids after all, even if they don’t think they are. It’s a really awesome system. Again, thanks to my friend, Amber, for sharing that with me.

What to download the grid to try it out in your classroom?

The Same Thing But Different

You may have seen that I only did this for a few months. I had to stop because in semester 1, I was a traveling art teacher. Some of the classrooms were impossibly set up to where I couldn’t physically get to the students who I wanted to stamp. I found myself crawling over the students and tables just to give stamps, so it didn’t work out. (Now that I am back mostly in the more spacious art room, I probably could start it again with good results.)

So I now do the same thing in a way. Each kid still has a grid of 10, but it is on a printed seating chart on a clipboard. The grading software we use at my school has an option to print the seating chart with the grid, so it’s super easy.

I have a list of codes taped to the clipboard for various participation activities–working hard, not paying attention, participating in discussions, talking, out of seat when not permitted, etc. I carry this around while I teach and mark when appropriate. (Yes, “giggling weirdly” is on there. It was a joke for my 8th grade boys who are the giggliest bunch of kids you’ll ever see.) When it starts to fill, I’ll enter class participation grades in the gradebook and print a new seating chart.

When students get disengaged, talk too much, etc, I point out the clipboard to them reminding them that their behavior is being documented. If students get more than three bad marks during a lesson, there is some sort of consequence (in our school, we use a discipline book with systematized consequences).

Class Dojo

The K-5 Art Teacher at my school just introduced me to a program called Class Dojo. It is essentially the same as above–giving and taking away points. It’s a website and app, and each kid has a little monster avatar that they can personalize which they find to be super fun (even the 8th graders). I like it, because I have one particularly goofy 6th grade class. They are great at participation during lessons, but getting them settled is a challenge because it is the last class of the day, and they come straight from PE. I can take my phone out into the line and use the app, and when I give negative or positive points, it plays a sound, so the students have that auditory reminder that they should be making better choices. The sounds from the app do the nagging for me.

When they are working, I can show the whole class up on the screen using the projector, and when I give or take away points from my phone, a pop up will show who got the points. The students LOVE getting points, and I am finding that students who don’t usually speak up in discussions do so just so they can get the points for it. I have some rewards in store for students who reach a certain number of points as well.

You can create your own categories for points, and they whole system works very well so far. I was worried I wouldn’t be able to manage the giving and taking away points while teaching, but it hasn’t been an issue at all so far.

(This post is in no way sponsored by Class Dojo. I just like it and use it, so I wanted to share.)

So, there you have it! Three ways to measure participation in an art classroom. Remember, you can download my grid handout if you want by clicking below.

Free Resource!

Stamp of Approval: Assessing Student Participation

Classroom management tool for you and a review activity for your students.

Download

Free Resource!

Stamp of Approval: Assessing Student Participation

Classroom management tool for you and a review activity for your students.

Filed Under: Art Teacher Tips


February 28, 2017 11 Comments

The Liberation of Aunt Jemima

The Art Curator for Kids - Masterpiece Monday - Betye Saar - The Liberation of Aunt Jemima - Art Projects - Art Interpreation - Art Discussion Questions

The Art Curator for Kids - Masterpiece Monday - Betye Saar - The Liberation of Aunt Jemima - Art Projects - Art Interpreation - Art Discussion Questions

Today’s artwork is The Liberation of Aunt Jemima by Betye Saar.

Exploring Tough Topics through Art

This artist uses stereotypical and potentially-offensive material to make social commentary. I feel it is important not to shy away from these sorts of topics with kids. We can’t sugar coat everything and pretend these things don’t exist if we want things to change in our world. We need to have these hard conversations and get kids thinking about the world and how images play a part in shaping who we are and how we think. Art is an excellent way to teach kids about the world, about acceptance, and about empathy.

Betye Saar’s The Liberation of Aunt Jemima

Betye Saar. The Liberation of Aunt Jemima, 1972
Betye Saar, The Liberation of Aunt Jemima, 1972, click image to view larger

This artwork is an assemblage which is a three-dimensional sculpture made from found objects and/or mixed media. It’s essentially like a 3d version of a collage.

In the artwork, Saar included a knick-knack she found of Aunt Jemina. It was Aunt Jemima with a broom in one hand and a pencil in the other with a notepad on her stomach. Instead of the pencil, she placed a gun, and in the other hand, she had Aunt Jemima hold a hand grenade. In the spot for the paper, she placed a postcard of a stereotypical “mammy” holding a biracial baby. The mammy’s skirt is made up of a black fist, a black power symbol. She put this assemblage into a box and plastered the background with Aunt Jemima product labels.

Art Discussion Questions

Okay, now that you have seen the artwork with the description, think about the artwork using these questions as a guide. Or, use these questions to lead a discussion about the artwork with your students.

  • What was your first reaction to seeing this image?
  • What do these images remind you of?
  • Describe the women in this image. What is wrong about how they are portrayed?
  • What is the artist trying to say by putting these objects and images together? What is her message?
  • Saar called this her first protest piece. What is she protesting?
  • Why do you think the artist included the gun and hand grenade? Do you think they symbolize violence or something else?

Interpretation of Betye Saar’s The Liberation of Aunt Jemima

Saar’s goal in using these controversial and racist images was to reclaim them and turn them into positive symbols of empowerment. Instead of me telling you about the artwork, let’s hear it from the artist herself!

Watch this video of Betye Saar discussing The Liberation of Aunt Jemima:

Isn’t it so great we have the opportunity to hear from the artist?

Related Art Learning Activities

Use these activities to further explore this artwork with your students.

Stereotypes Art Project:

Students can make a mixed-media collage or assemblage that combats stereotypes of today. It’s easy to see the stereotypes and inappropriateness of the images of the past, but today these things are a little more subtle since we are immersed in images day in and day out. Have students look through magazines and contemporary media searching for how we stereotype people today through images (things to look for: weight, sexuality, race, gender, etc.). Then, have students take those images and change and reclaim them as Saar did with Aunt Jemima.

Research and Writing Activity:

Have students study stereotypical images of African Americans from the late 1800s and early 1900s and write a paper about them. They also could compare the images from the past with how we depict people today (see art project above).

Study More Artists:

Have students study other artists who appropriated these same stereotypes into their art like Michael Ray Charles and Kara Walker. Students can look at them together and compare and contrast how the images were used to make a statement. Note: I would not study Kara Walker with kids younger than high school. There are some disturbing images in her work that the younger kids may not be ready to look at.

This post was originally published on February 15, 2015.

Filed Under: Art and Artists
Tagged With: betye saar


February 14, 2017 Leave a Comment

Interpreting the Power of the Kongo Nkisi N’Kondi

Inside: Have students use drawing and kinesthetic activities to explore the Nkisi Nkondi power figures from the Kongo people.

Can a student connect with and understand an artwork from Africa without any contextual information? One of the biggest struggles in teaching art from other cultures is that it is not so easily discussed and interpreting through our Western lens.

In my recent online workshop, How to Talk about Art with Kids, I asked the participants how their questioning strategy might differ between these three artworks.

 nkisi nkondi


The participants said that they would focus more on emotion and story for the first artwork, the elements and principles for the second artwork, and the history and use of the object for the third (nkisi nkondi). Each artwork lends itself to a different type of discussions, but I believe that any artwork has a meaning already in it that we (and our students) can discover through enough looking and discovery.

The nkisi nkondi, while it may seem so different and foreign, can be interpreted by a group of students to determine its meaning, function, and purpose just through close looking and targeted questions from the teacher.

With my middle school students, I have recently begun a unit on African sculpture. We will be looking at all sorts of different sculpture from around Africa before we make one culminating time-capsule-ish artwork that pulls together big ideas from multiple types of African sculpture.

 nkisi nkondi

We started the unit with some of my favorite artworks from any time or culture, the Nkisi Nkondi power figures from the Kongo people of West Central Africa. These nkisi nkondi sculptures are truly captivating and exciting to anyone who sees them. From other teachers catching a glimpse at my copies in the office to the first reactions of the students to subs passing through, everyone stopped in their tracks to look more closely.

 nkisi nkondi
Met Museum

See if you can figure out what these nkisi nkondi sculptures were all about on your own before reading on.

Ask yourself:

  • What’s going on here? Describe the sculpture–its contents, proportion in art, and pose.
  • What do you think the nails are for? Were they placed there by the artist all at the same time or were the hammered in over a longer period of time?
  • How do you think the nkisi nkondi was used by the people who made it? What was its function?
  • What is the personality of this person? What is he doing?

 nkisi nkondi

After discussing the nkisi nkondi and developing ideas about it, I invite my students to stand up and put themselves into the pose of the nkisi nkondi as well as mimic the facial expression of the figure. It’s a pretty hilarious activity, but in all of my classes that did this, at least one student came to a conclusion that is close to the object’s original meaning.

After asking how they felt (after giggling about how they feel like they might be pooping), many students said they felt powerful. One 9th grader said he felt like a teacher getting onto a student, and a 6th grader said she felt like a parent getting onto her child.

I asked the students what it would feel like to be on the other side of that stance. What if this person were standing in front of you like that; how would you feel? Students said they would feel smaller, intimidated, or that they had done something wrong.

 nkisi nkondi

After the activity, I explain to the students the actual meaning and function of the artwork. Nkisi N’Kondi means “hunting spirit,” and its job in the community is to be an enforcer–enforcing laws and treaties, sealing vows/promises, and getting rid of evil. The students who felt like they were a teacher getting onto their students were right!

Important medicines, ancestral earth, and other things were placed in the stomach of the nkisi nkondi to give it the power and bring in the hunting spirit. In most cases, the hole was covered with a shell or mirror. When a promise or treaty was made, community members would drive a nail into the nkisi nkondi sealing the vow. If that promise was broken, the Nkisi N’kondi would hunt down the wrong-doer and punish him or her for his misconduct.

 nkisi nkondi

To spend some more quality time with the art as well as practice drawing skills, I had my students draw the Nkisi Nkondi.

 nkisi nkondi

We also looked at and discussed Congo artist Trigo Piula’s usage of the nkisi nkondi figure in a contemporary painting.

 nkisi nkondi

We will use elements of this sculpture, the Benin relief sculptures, and others to create one artwork that explores what fuels us as individuals in the way that the medicines and other items placed in the Kongo sculpture gave it its life.

Mentioned on the Art Class Curator Podcast…

SPARKworks Lesson: Kongo Peoples, Nkisi N’Kondi Power Figure

This is a full lesson on the Nkisi N’Kondi Power Figures from the Kongo peoples. Students will explore and connect with this artwork through discussion, kinesthetic activities, and more!

Buy Now

Get the Full Lesson!

This Lesson is in The Curated Connections Library!

Find the full lesson from this post along with hundreds of other art teaching resources and trainings in the Curated Connections Library. Click here for more information about how to join or enter your email below for a free SPARKworks lesson from the membership!

Join the List

Get the Full Lesson!

This Lesson is in The Curated Connections Library!

Find the full lesson from this post along with hundreds of other art teaching resources and trainings in the Curated Connections Library. Click here for more information about how to join or enter your email below for a free SPARKworks lesson from the membership!

Filed Under: Art and Artists, Art Connection Activities
Tagged With: best of art class curator


January 29, 2017 2 Comments

Easy to Interpret for a Reason: Analyzing World War II Propaganda Posters

This semester, my schedule works out to where one of my classes will not have art almost each Friday due to our school’s new (awesome) service program. I’d like to keep them on the same schedule with my other classes, so I decided to implement an artwork of the week discussion on Fridays with my other classes so that I can (attempt to) keep them all at the same pace.

The artwork of the week will be one that I choose that may or may not be related to what we are covering in class, but it will give them by the end of the semester a lot of art discussions under their belt just for the sake of looking at and thinking about art. Because that is important.

This week, we looked at Don’t Let That Shadow Touch Them by Lawrence Beall Smith. I’ve discussed this artwork many times with varying ages of students, and I would say it is good for 6th grade and older as 6th graders usually would have covered World War II at some point in their education. I also have included this work as an art criticism essay test question when I taught college as well.

Take a look at the artwork and think about the following questions. I had my students look and write about it quietly before we had any discussion about it. These are the questions I used.

  • What does the shadow represent, and why would you not want it to touch the children?
  • What symbols and images did the artist use to create emotion in the viewer?
  • What emotion did the artist want you to feel when viewing this artwork?
  • Why was this artwork created?

I like to have students write about this one first because it is pretty easy to interpret so the discussions are not quite as long as they would be if the meaning was more enigmatic. We discuss that point though; it is easy because it was meant to be easy. The makers of the poster wanted to hit you hard and fast so you would take action.

This was a work of propaganda from the U.S. Government during World War II. The U.S. and other governments printed posters during the war in order to encourage people to support the war effort, especially through financial support by buying war bonds.

Free Poster

What Do Kids Learn from Looking at Art Poster

Our students learn so much from looking at art. Use this poster in your classroom to remind them of all the skills they’re growing!

Download

Free Poster

What Do Kids Learn from Looking at Art Poster

Our students learn so much from looking at art. Use this poster in your classroom to remind them of all the skills they’re growing!

The shadow is of course the swastika, the emblem of the Nazi party. The All-American children hold symbols of their country and the war — a toy plane, an American flag, a newspaper, and a doll. The artist inspires fear with the looming shadow and concerned expressions but takes it to the extreme with the doll who has been touched by the shadow and who now appears dead.

This artwork was featured for Masterpiece Monday, a weekly art discussion I lead on Facebook. You can watch the video below and sign up to get reminders for Masterpiece Monday by clicking here.

According to Grinnell College, this artwork was originally based off of a Canadian work with a similar theme.

Looking through even more World War II propaganda posters, it’s interesting to see all of the people they are trying to reach and the emotions. From a patriotic dad to a lovesick new wife to a worried mom, they’ve got them all covered.

Check out this slideshow for a few more World War II posters that I found interesting!

[slideshow_deploy id=’11564′]

After discussing the work, I discuss with the students the meaning of propaganda and the choices that artists and the people who commission them make to manipulate the viewer.

We live in a world that bombards us by images, and I’d like to think that stopping and looking at art like this makes us better prepared to face what we see in magazines, on the internet, and in newspapers today.

Filed Under: Art Connection Activities
Tagged With: lawrence beall smith


December 27, 2016 2 Comments

7 Exciting Art History for Kids Projects that Made Me Say “WOW!”

Inside: This collection of exciting art history for kids projects will excite your students with creative process art at the same time as connecting with an artist from art history. These art history for kids projects are so clever!

the Art Curator for Kids - 7 Art History for Kids Projects that made me say Wow!

While I was developing the Art History for Kids pinboard, I came across approximately 400 projects based on Kandinsky’s circles (I don’t judge. I totally did a Kandinsky circle project with my elementary kids when I taught, and it was uber-successful.) and many more fabulous art history for kids projects. But after a while they were all starting to blend together, but there were a couple that stood out and made me say “Wow! That is amazing!” I kept thinking about these projects over the next few days and decided I needed to give these awesome bloggers a shout-out.

So here you go. In no particular order, here are 7 awesome art history for kids projects that I found to be super exciting.

I am always choosing 5 things, so I went with 7 today. It feels weird. I miss 5.

“Where the Fauve Things Are” at My Small Potatoes

Art History for Kids Projects, Fauvism Projects for Kids, Henri Matisse

This art history for kids project is so amazing. Look at those kids. They are having a BLAST! Arlee at My Small Potatoes totally captures the essence and sheer joy of Fauvism and really taught her kids something about Fauvism and Henri Matisse in such a fun and silly way. Not to mention, the images on her blog are just gorgeous. What a treat!

“Kids Get Arty: Exploring Mike Kelley for Kids” at Red Ted Art

Art History for Kids Projects, Mike Kelley

I loved this project, because of it’s close ties with the artwork, the unexpected artist choice of Mike Kelley, and the sheer fun of the activity. How fun would it be to stick a bunch of random stuff in clay? Really fun. Excuse me while I go do this.

“Starry Night Art with Melted Crayons” at Happy Hooligans

Art History for Kids Projects, Vincent van Gogh

In this project, Jackie and the Hooligans painted in shades of blue and yellow onto aluminum foil and then melted crayon shavings onto the paintings. Yes! So beautiful and satisfying and all things perfect.

“Kids Get Arty: Exploring Street Art & Banksy” at Red Ted Art

Art History for Kids Projects, Banksy Art Projects for Kids, Street Art for Kids

Maggy at Red Ted Art gets an extra shout-out, because she is just that awesome. I really love projects that go beyond the usual suspects of Monet, van Gogh, etc. Her project inspired by the street artist Banksy takes kids outdoors and gets them thinking about art in new and different ways. And that kangaroo they put on the side of the house? Super cute.

“The Great Artist Vincent van Gogh…A Study in Self Portraiture” at My Small Potatoes

Van Gogh Mirror Painting, Art History for Kids

I totally realize I just said I like projects that go beyond van Gogh, and then I included two van Gogh-inspired projects. Sshh. I know. I know. This one I loved again because the kids get to explore and do something new and different. Art is more than paper and paint. Arlee nails it again by having her kids paint their portraits right onto the mirror. And then they take paper and make a print from the mirror? Icing on the cake.

“Inspired {Wayne Thiebaud}” at Dilly-Dali Art

Art History for Kids, Wayne Thiebaud

Speaking of icing, check this out. She made FROSTING PAINT. That’s all I have to say about that. FROSTING PAINT! Genius.

“Inspired {Helen Frankenthaler}” at Dilly-Dali Art

Art History Projects for Kids, Helen Frankenthaler, Abstract Expressionism for Kids

I really love this art history for kids activity. Not only is the final product beautiful, but it really captures the spirit of Abstract Expressionism emphasis on the expression and actions of an artist. Extra bonus points go to Aleacia at Dilly-Dali Art for choosing a woman artist, Helen Frankenthaler, for her project.

~

This art history for kids post was originally published on October 24, 2014.

Filed Under: Art Teacher Tips
Tagged With: banksy, helen frankenthaler, henri matisse, mike kelley, vincent van gogh, wayne thiebaud


  • Previous Page
  • Page 1
  • Interim pages omitted …
  • Page 17
  • Page 18
  • Page 19
  • Page 20
  • Page 21
  • Interim pages omitted …
  • Page 38
  • Next Page

Primary Sidebar

Hi! I’m Cindy Ingram, the creator of Art Class Curator and The Curated Connections Library

I’m on a mission to revolutionize education with the power of life-changing art connections. Art is not “extra”. Art is essential. We are empowering teachers to bridge the gap between art making and art connection, kindling a passion for art that will transform generations.

More About Me

Free Worksheets!

-Free Bundle of Art Appreciation Worksheets-

In this free bundle of art worksheets, you receive six ready-to-use art worksheets with looking activities designed to work with almost any work of art.

Download

Free Worksheets!

-Free Bundle of Art Appreciation Worksheets-

In this free bundle of art worksheets, you receive six ready-to-use art worksheets with looking activities designed to work with almost any work of art.

Enrollment in Curated Connections Library is currently open. Click here to join. Join our list to get more information and to get a free lesson from the vault! If you are purchasing for a school or school district, head over here for more information.

Check Out What’s New In The Shop

Experience Art: Engaging Art Criticism Discussions and Activities for Teachers and Students of All Ages
Call to Art: An Un-Conference for Art Educators
Curated Connections Library Membership
Perspectives High School Curriculum

More Products

Have You Listened to the Latest Podcast Episode?

Falling for Naudline Pierre’s Evocative Art: A Conversation with Madalyn (Part 2)

More Episodes

Testimonials

I like how this program, unlike other art class resource membership programs, feels authentic. It's like art matters more here, and not fancy flash-in-the-pan trendiness. The goal of Art Class Curator seemed to be helping kids develop a lifelong love and art appreciation versus "Hey, look. I painted this fish."
Erin A.
Your questions are helping me to delve into much deeper learning, and my students are getting better at discussion-and then, making connections in their own work. Art Class Curator is awesome!
Denise W.
Interestingly, my lower performing classes really get engaged in these [lessons] and come away with some profound thoughts!
Melissa G.
I had the most amazing 6th grade class today. They were jumping out of their seats with hands raised just to respond and give input. It was as if I was waving candy in front of them! They saw more and more and the ideas and interpretations unfolded. So cool!!! This is what makes teaching art so wonderful – thank you!!
Caroline G.
I just wanted to thank you for the invaluable resource you have through Art Class Curator. Not only do you have thought provoking activities and discussion prompts, but it saves me so much time in preparing things for myself! I feel like I’ve only scratched the surface with your site.
Maryjane F.

Get Art Inspiration To Your Inbox!

Enter your email address to get regular art inspiration to your inbox
plus a BUNDLE OF 6 FREE WORKSHEETS!
We hate SPAM and promise to keep your email address safe.
Download

Free Worksheets!

*Free Bundle of Art Appreciation Worksheets*

In this free bundle of art worksheets, you receive six ready-to-use art worksheets with looking activities designed to work with almost any work of art.

Copyright © 2026 Ignite Art, LLC DBA Art Class Curator •  All rights reserved  •  Privacy Policy  •  Terms of Service  •  Site Design by Emily White Designs