• Skip to main content
  • Skip to primary sidebar
  • About
    • About Art Class Curator
    • Contact
    • Speaking
    • Media & Press
    • Programs for Schools
  • Blog
  • Podcast
  • Shop
  • Join
  • Member Login

Art Class Curator

Hands-on and Minds-curious Art Learning

  • Art & Artists
  • Art Connection Activities
  • Art Teacher Tips
  • Elements & Principles
  • Downloads & Resources
Home
  • About
    • About Art Class Curator
    • Contact
    • Speaking
    • Media & Press
    • Programs for Schools
  • Blog
    • Art & Artists
    • Elements & Principles
    • Art Connection Activities
    • Art Teacher Tips
    • Downloads & Resources
  • Book
  • Podcast
  • Shop
  • Join
  • Member Login

All Posts from Art Curator for Kids

December 3, 2015 Leave a Comment

Glassblowing Field Trip and Activity

The-Art-Curator-for-Kids---Glass-Blowing-Field-Trip-and-Kids-Activity

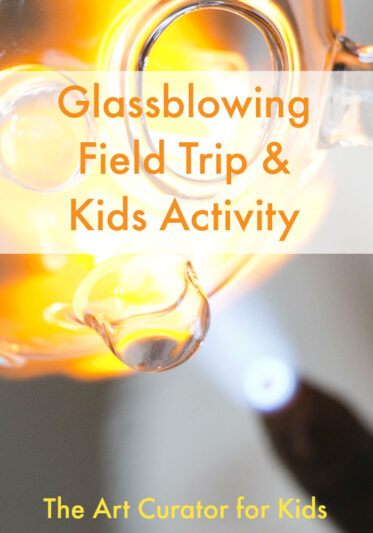
With one of our homeschool groups, we recently had the opportunity to visit Dallas Glass Art, a glass studio in downtown Dallas, for a tour and to see a demonstration. Glassblowing is one of my bucket list items, so I was so thrilled to have the experience for myself as well as provide a fun opportunity for my kids.

The-Art-Curator-for-Kids---Glass-Blowing-Field-Trip-and-Kids-Activity

Pre-Visit Glass Art Lesson

To prepare for our visit, I gave a little lesson to the kids in our playgroup. First, we passed around a piece of art glass I own and made guesses about how it might have been made, how they added the color, etc. Then, we watched a couple of YouTube videos watching some glass sculpture in action.

The-Art-Curator-for-Kids---Glass-Blowing-Field-Trip-and-Lesson

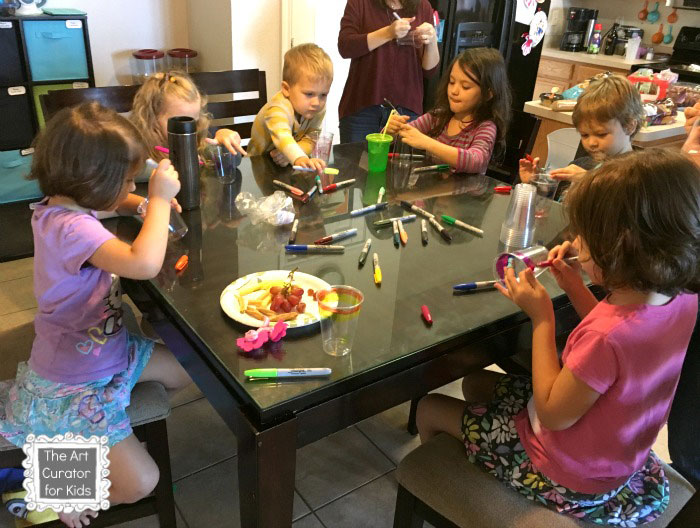
After the videos, we did this melting cups activity from Craftwhack.

Dallas Glass Art Studio

At the studio, we sat on bleachers while one of the moms in our homeschool group told us about the space and everything in it. Her and her husband both work at the studio, so it was fun to get the inside scoop and be able to ask lots of questions.

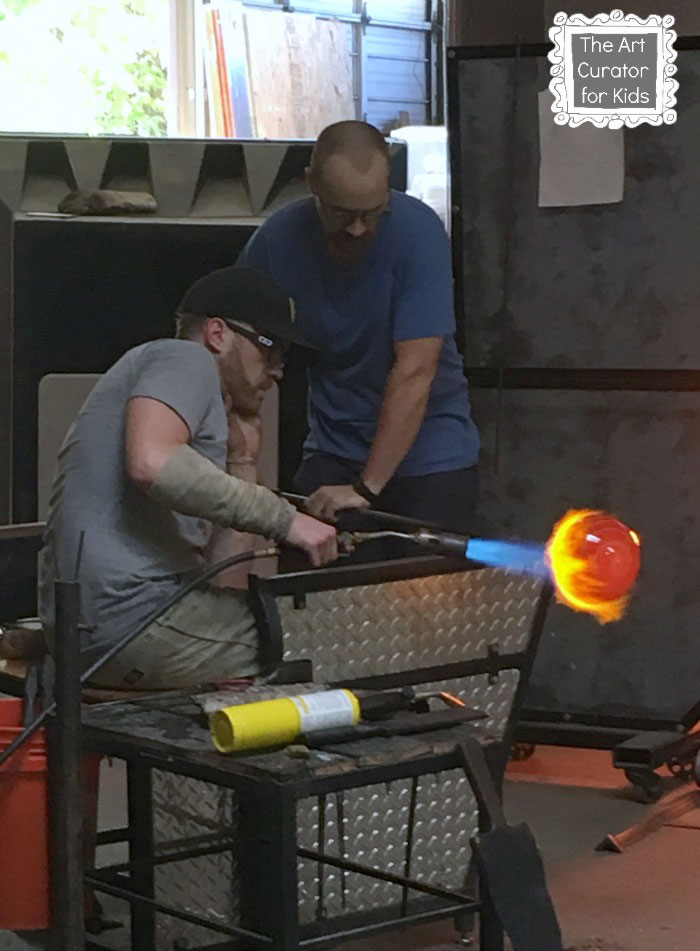
There were three glass artists working together to make a large glass bowl.

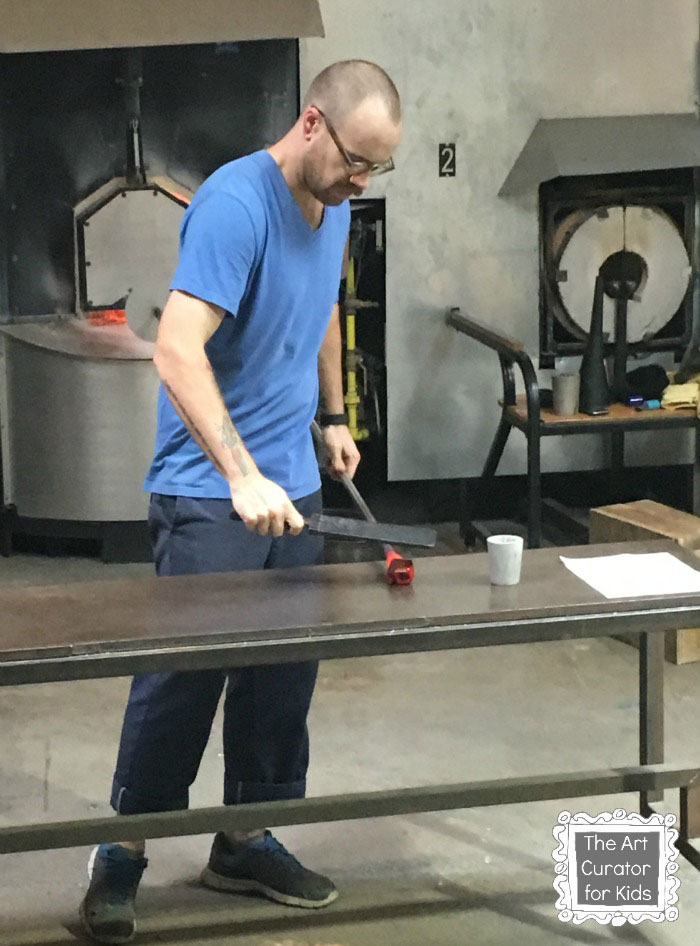
The furnace that holds the clear glass is 2000 degrees! Even though it was a chilly day, we were burning up. This artist just got a small piece of glass from the furnace and is rolling it out on a large steel table called a marver.

The-Art-Curator-for-Kids---Glass-Blowing-Field-Trip-and-Lesson---Glass-Blowing-Demonstration---Rolling-Glass-on-Marver

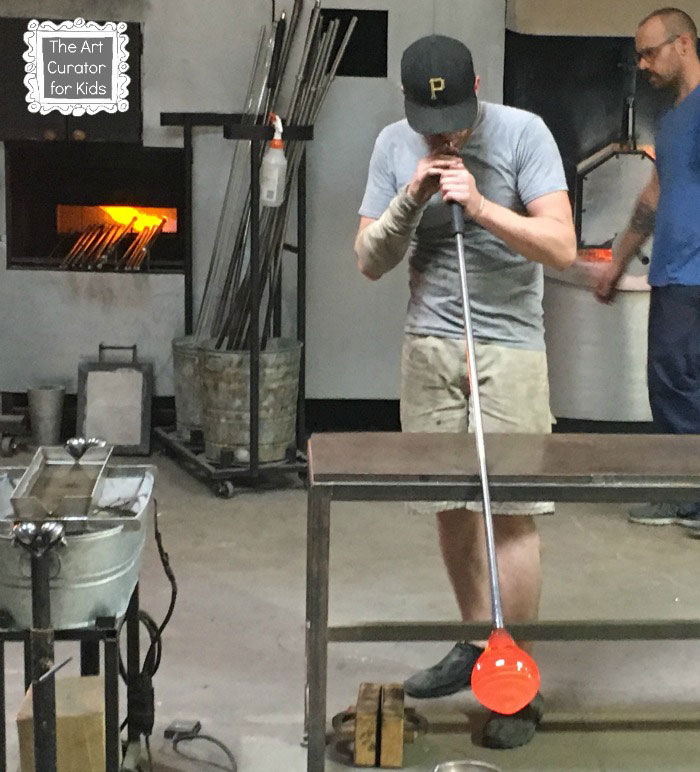
In this photo, the artist blew a small puff of air into the tube and put his finger over the opening. The air forced itself through the tube and into the glass. You can see the bubble being formed at the end.

The-Art-Curator-for-Kids---Glass-Blowing-Field-Trip-and-Lesson---Man-Blowing-Bubble-in-Glass

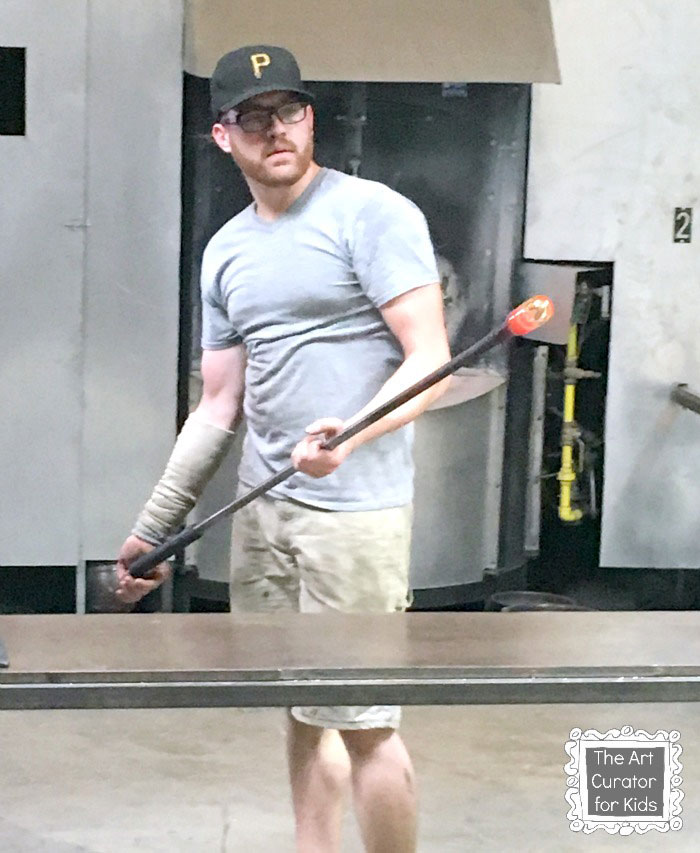
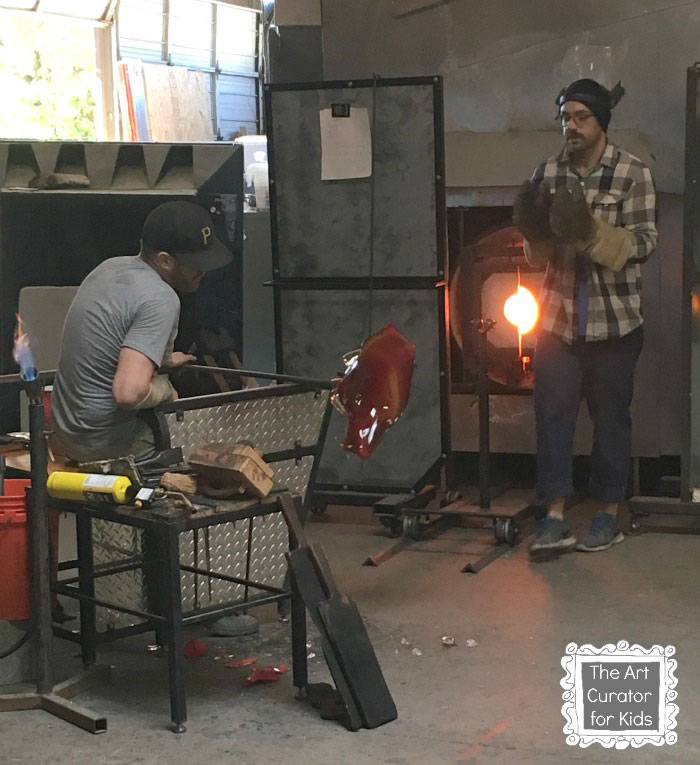
Most of the time we were there, they added more and more glass. They got a small piece at a time (about the size of a golf ball it looked like) from the furnace and then rolled it out to merge the pieces together on a table. For maybe 30 minutes or so, they repeated this step over and over until the glass was the size they needed it to be for the final piece.

After adding layer upon layer of glass, you can see how big it eventually got below.

The-Art-Curator-for-Kids---Glass-Blowing-Field-Trip-and-Lesson---Glass-Blowing-Demonstration2

We watched as they spiraled different colors together. Different colors are softer than others, so they have to pair soft colors with hard ones in order to give the final piece strength. In the picture, it is orange, but the final piece will not be orange. The orange is the heat!

After rolling and blowing it, then move to another station. One artist rotated the pole and used stacks of newspaper to rub the surface while the other blew on the end while it was spinning. It was incredible to watch the teamwork!

The-Art-Curator-for-Kids---Glass-Blowing-Field-Trip-and-Lesson---Glass-Blowing-Demonstration

Here’s a video I took of this part.

At one point, they ended up with a bubble in the glass that they didn’t want. In this case, they used a blow torch and some extra manipulation to get the bubble out before they made the bowl.

The-Art-Curator-for-Kids---Glass-Blowing-Field-Trip-and-Lesson---Glass-Blowing-Demonstration---Blow-Torch

The last part went really fast. After the careful and deliberate work of building up the glass, it was done in an instant! Here they are catching the final piece to put into a 1000 degree kiln to cool for 12-24 hours.

The-Art-Curator-for-Kids---Glass-Blowing-Field-Trip-and-Lesson---Catching-the-Final-Piece

I have to say it was pretty amazing! I was so glad to have the experience. Thanks so much to the artists at Dallas Glass Art for giving us such an amazing experience!

Filed Under: Art and Artists, Art Teacher Tips


November 22, 2015 5 Comments

Mound Builders Lesson Plan

The Art Curator for Kids - Prehistoric American Mound Builders Lesson Plan

Over the course of a 5,000 year period in prehistoric times along the Mississippi River in eastern North America, many groups of Native Americans built mounds, often in the shape of animals, of earth. We call these groups Mound Builders, and while they each had their own unique traditions and artworks, they all built mounds. This Mound Builders Lesson Plan will teach your students about archaeology, the possible functions of the mounds, and the art found inside.

The mounds were often used as burial places for important leaders, and they also contained objects like jewelry, pottery, artworks, food, and more. They also sometimes built temples and important buildings on top of the mounds.

The Art Curator for Kids - Prehistoric American Mound Builders Lesson Plan
Photo Credit: Eric Ewing

Mound Builders Lesson Plan

I’m going to write the rest of this post as a lesson outline, and I have upper elementary students in mind as I write this, but it could be adapted for older students.

Get the Full Lesson!

This Lesson is in The Curated Connections Library!

Find the full lesson from this post along with hundreds of other art teaching resources and trainings in the Curated Connections Library. Click here for more information about how to join or enter your email below for a free SPARKworks lesson from the membership!

Join the List

Get the Full Lesson!

This Lesson is in The Curated Connections Library!

Find the full lesson from this post along with hundreds of other art teaching resources and trainings in the Curated Connections Library. Click here for more information about how to join or enter your email below for a free SPARKworks lesson from the membership!

Mound Builder Archaeology Activity

To start a lesson on the Mound Builders, have students work in groups to analyze some objects. Each group should be given a  collection of objects buried in sand or dirt (or torn and crumpled up brown paper bags if you don’t want to get your stuff dirty) that might tell a story about a group of people. It doesn’t have to be about Native Americans, it could just be about your family something like that. Maybe a trophy, an old photograph, jewelry, etc.

Have students analyze the group of objects together to figure out what they know about the people who owned the objects.

  • Make a list of the objects in your mound.
  • Make a list that describes the person or people who owned these objects. What do you know about them based on what they buried in this mound?
  • Why do you think these objects were buried?

Have students share their findings with the class and lead a discussion about how archaeologists make guesses about people based upon the choices they made and what they left behind.

Art Discussion

Serpent Mound
Serpent Mound

Show the above image to the students and ask the following questions.

  • What is this?
  • What imagery do you see?
  • What is the circle on the left side of the drawing?
  • Why do you think it was made? What was it used for?
  • Why do you think they made the mounds in animal shapes?
  • How do you think they made these? How long do you think it took them?

Share the information above about the mounds–they were used for burials, were in animal shapes, contained important objects, had important buildings sometimes on top, and were probably used in ceremonies.

Artifacts

This mound is Craig Mound or The Spiro Mound located in Eastern Oklahoma.

The Art Curator for Kids - Mound Builders Lesson - Photo Credit Herb Roe
The Spiro Mound / Craig Mound, Photo Credit: Herb Roe

Wikipedia says, “A cavity created within the mound, about 10 feet high and 15 feet wide, allowed for almost perfect preservation of fragile artifacts made of wood, conch shell, and copper. The conditions in this hollow space were so favorable that objects made of perishable materials such as basketry, woven fabric, lace, fur, and feathers were preserved inside it.”

The Art Curator for Kids - Mound Builders Lesson 2- Photo Credit Herb Roe
Photo of an engraved shell gorget with S.E.C.C. imagery from Spiro Mounds Oklahoma, Photo Credit: Herb Roe

Show students the types of objects found in the mound at this link. Ask students to reflect on why these objects were placed in the mounds. This page also has lots of images of artifacts from Mound Builders.

The Art Curator for Kids - Mound Builders Lesson 3- Photo Credit Herb Roe
A stone effigy pipe from the Spiro Mound Site, known as the Lucifer pipe, Photo Credit: Herb Roe

This video has some good images and a summary as well about the Mound Builders. It may be a little over the head of younger elementary kids, but the upper elementary kids could probably benefit from it.

Writing and Drawing Activity

Have students draw a design for a mound made to honor themselves and make a list of the items that they would bury in the mound. Have students consider the shape and location of the mound in addition to its contents.

Let me know if you did this activity with your kids in the comments! I’d love to see what the put in their mounds. 🙂

Filed Under: Art and Artists, Art Teacher Tips, Downloads and Resources


November 20, 2015 20 Comments

Making Art with Kids: Block Printing Lesson

Block printing is one of my favorite things to do with kids (and with myself for that matter, who needs a kid to have fun with art?). Later in the week, I will be featuring some Japanese woodblock prints as part of my Art Spotlight series, so in preparation for that, I will show you some ways to make block prints at home.

Please note, this post includes Amazon affiliate links. As an Amazon Associate I earn from qualifying purchases.

Free PDF!

Printmaking Instructions

Display, print, or laminate these instructions to show students each step in the printmaking process.

Download

Free PDF!

Printmaking Instructions

Display, print, or laminate these instructions to show students each step in the printmaking process.

What is a Block Print?

You can think of a block print kind of like a homemade stamp. You take a material like wood (“woodcut”) or linoleum (“linocut”) and carve away every part of the image you want to be white (or whatever color your paper happens to be). Professional printers from throughout art history use layered color and precise tools to make beautiful and detailed works, and you and your students can too using the processes I describe below. Although it is possible to make a print with multiple colors, I recommend starting with one color. There are lots of ways to make block prints at home with your kids, and I will focus on two types here in this post: foam printing and linocut printing.

Foam Printing

The Art Curator for Kids - Making Art with Kids - Block Printing Lesson Art Tutorial

Foam printing involves drawing deep lines into Styrofoam and using ink or paint to transfer this image onto paper. This is the cheapest way to do a block print and the safest and most accessible for young children. One way is just taking a Styrofoam plate, cutting off the rim so you end up with a flat disk, and carving/drawing on it with a dull pencil, a stick, or a ballpoint pen. Make sure the lines you draw are pressed deep into the foam for the best results. Next, spread printing ink (or even some tempera paint thinned just a bit with some water) over the surface of the foam using a paintbrush or roller (see more tips about spreading the ink below). Then put your paper on top, press down over the whole surface of the paper with the back of a spoon or a roller, and then lift the paper off.

Try it a few times first so you know exactly the right process before you have the kiddos do it as this can sometimes not work well if you don’t push down hard enough or use paint instead of printing ink. I recommend using ink because the results will be much cleaner! Instead of using a plate, you can also buy packs of foam printing plates for this same purpose in a variety of sizes. You’ll have better results with these and you don’t have to worry about chopping up the plates. See the supplies list at the bottom of this post for recommendations and links.

Linocut Printing

My favorite way of block printing is to use easy-cut rubber blocks that more closely mimic the process of using linoleum and wood but is still easy enough for an elementary-age student to cut (with close supervision). You need some specialized supplies for this, but they are not too pricy and they can be used over and over with the exceptions of the blocks themselves. See a supply list with links at the end of the post.

First, sketch the design onto the print block. You can use transfer paper to transfer a drawing or draw right on the block. Tracing your design in a permanent marker will help you when you start cutting. Also, be sure to do all text and numbers backward as the resulting print is a mirror image. Next, use a linoleum cutter to carve out all of the areas of the design that you want to be white. This tool usually comes with several tips for different thicknesses of lines. If you have a true linoleum block, this will take some muscle. If you have an easy-cut rubber block, it will cut smoothly and quickly, like butter. I’ve had upper elementary age kids use these with little trouble.

Safety Tip: Be sure to push away from your hands and your body when using this tool! I have a nice v-shaped scar on my pointer finger of my left hand from doing this on real linoleum on my bed when I was in college. It wasn’t a smart decision.

Next, spread some ink on an inking plate, a piece of glass, plexiglass, or anything non-porous and flat. Water-based printing ink is best. You can use tempera or acrylic paint, but it doesn’t work as well. Use a soft roller (or “brayer”) to roll the ink flat. Go in both directions to spread the ink evenly on the roller. Roll the ink onto the print block and then put the paper on top of the block. Use the back of a spoon or a second roller to press the paper onto the block (this is called “burnishing”). Here is a great video that covers the basics of how to ink and print.

Supplies

These are basic art supplies that you can buy at any art supply store, but I have put the Amazon affiliate link for your convenience.

  • Foam Printing Plates
  • Water-based Printing Ink
  • Soft Brayer for Inking
  • Linoleum Cutter
  • Easy-cut Linoleum Blocks
  • Inking Plate/Bench Hook

Like this? Stay tuned for an Art Spotlight post later in the week about Japanese woodblock prints! Let me know if you tried any of this out! I’d love to see your student’s work. Please share your pics below or on twitter.

This post was originally published June 30, 2014.

Filed Under: Art, Art Teacher Tips, Downloads and Resources


November 15, 2015 2 Comments

Impressionism Lesson Plan

The Art Curator for Kids - Impressionism Lesson

Hello! I apologize there have not been as many posts on the site lately. I’ve been busy homeschooling as well making new resources weekly for Curated Connections Library. I’m hoping I’ll figure out a new groove for balancing it all eventually! My parenting duties must come first. 🙂

The Art Curator for Kids - Impressionism Lesson

Today I have for you a new addition to The Art Class Curator Store and also The Curated Connections Library. This is an Impressionism lesson that includes excellent learning activities for your high school and college students. The lesson includes working in groups to analyze art, an easy mnemonic device, reading and analyzing primary source materials to uncover the critical reaction, and discussing how inventions impacted art. I also included a video explanation of the lesson to help you adapt this lesson to best accommodate your students.

The lesson involves analyzing works from the first Impressionist exhibit in 1874 in groups and then reading primary source critiques of the art. I think it is important to teach students how revolutionary Impressionism really was because their art style is pretty normal to us (think hospital and hotel rooms!). It’s fun to hear in the critic’s own words how they viewed the art.

The following files are included in this Impressionism lesson:

  • Video Explanation of Lesson and File Overview for Teacher
  • PowerPoint Lesson with Mnemonic Device
  • PowerPoint of First Impressionist Exhibit
  • Conventions In-Class Activity (DOC, PDF)
  • Reactions In-Class Activity (DOC, PDF)
  • Reactions Homework Assignment (DOC, PDF)
  • Primary Source Reviews (DOC, PDF)

Buy the Impressionism Lesson

Impressionism Lesson Plan, PowerPoint, Quizzes, and Project

This Impressionism lesson includes excellent learning activities for your middle, high school, and college students. The lesson includes working in groups to analyze art, an easy mnemonic device, reading and analyzing primary source materials to uncover the critical reaction, and discussing how inventions impacted art. Plus, a followup lesson with an Impressionist landscape project, included in the PowerPoint.

Buy Now

If you are a member of The Curated Connections Library, you can get this lesson and all of my other resources for one membership fee.

Get the Full Lesson!

This Lesson is in The Curated Connections Library!

Find the full lesson from this post along with hundreds of other art teaching resources and trainings in the Curated Connections Library. Click here for more information about how to join or enter your email below for a free SPARKworks lesson from the membership!

Join the List

Get the Full Lesson!

This Lesson is in The Curated Connections Library!

Find the full lesson from this post along with hundreds of other art teaching resources and trainings in the Curated Connections Library. Click here for more information about how to join or enter your email below for a free SPARKworks lesson from the membership!

Filed Under: Art and Artists, Art Teacher Tips


November 5, 2015 Leave a Comment

The Art of the Northwest Coast American Indians

The Art Curator for Kids - Northwest Coast Indian Art Lesson Plans

November is Native American Heritage Month, so this month, I will be dedicating the whole month of posts to Native American artworks!

I’m going to start the series with some of my favorite art objects from the native cultures from the Northwest Coast of North America.

The Art Curator for Kids - Northwest Coast Indian Art Lesson Plans

More than 16 nations make up this grouping including Tlingit, Haida, Heiltsuk, Nuxalk, Tsimshian, and Kwakwaka’wakw. Although each group has it’s own unique culture and art, they do share some commonalities, and I am highlighting some of the art forms that cross between many of the groups.

The Northwest coast has rich forests, rivers, and rocky coastlines. Their art reflected this environment. Much of their art was created with the abundant trees from the area and featured animals found in the forests, rivers, and oceans such as eagles, beavers, whales, wolves, ravens, frogs, and bears.

These animals had special meanings and symbols and individual clans had animals associated with their clan. For example, whales symbolize ancient wisdom and awareness, beavers stand for creative and artistic ability, and frogs symbolize spring and new life.

The Art Curator for Kids - Northwest Coast Indian Art Lesson Plans - Totem Pole

Some of the Northwest Coast groups incorporated these animals onto totem poles, which are super tall sculptures made from the trunk of a tree, usually cedar. The designs usually include stacks of stylized animals done in an abstract and bold way.

** Read more… See my post about Tlingit totem poles.

The Art Curator for Kids - Northwest Coast Indian Art Lesson Plans - Kwakwaka'wakwa House - Photo Credit - Ryan Bushby
Photo Credit: Ryan Bushby

The totem poles were often in front of long, narrow houses where up to 50 people from the same clan lived all together. These houses were also decorated in bold abstract animal designs as well. Totems represent the history of the clan/family. In addition to the special symbolism of the animals, the colors have special meanings as well.

The Art Curator for Kids - Northwest Coast Indian Art Lesson Plans - Kwakuitl Masks

On my trip to NYC in the summer of 2014, I discovered Kwakiutl transformation masks at the American Museum of Natural History. I found them to be so intriguing and like nothing I had seen before. The masks are interactive: beaks would be attached to strings to make it open and close making a loud clacking noise, masks could open up to then display a different character, or mouths could be removed and replaced with mouths with additional expressions. So. Very. Cool.

The Art Curator for Kids - Northwest Coast Indian Art Lesson Plans - Kwakuitl Masks - Mouthpieces

These masks were used in different types of ceremonies, and each Native American group might use them in a different way.

The Art Curator for Kids - Northwest Coast Indian Art Lesson Plans - Haida Button Blanket - Met Museum
Met Museum

Another interesting art form from this area is a Haida button blanket. The Haida artists sewed stylized animal designs and pieces of shell to simple wool blankets brought by European traders. These were worn during ceremonies and other special events. Often, the wearer would have a blanket design that represented his or her clan’s signature animal.

Of course, that is not all of the art from the Northwest coast! I have chosen a few art forms to highlight, but there is also basketry, pottery, boats, carved objects, and more.

Get the Full Lesson!

This Lesson is in The Curated Connections Library!

Find the full lesson from this post along with hundreds of other art teaching resources and trainings in the Curated Connections Library. Click here for more information about how to join or enter your email below for a free SPARKworks lesson from the membership!

Join the List

Get the Full Lesson!

This Lesson is in The Curated Connections Library!

Find the full lesson from this post along with hundreds of other art teaching resources and trainings in the Curated Connections Library. Click here for more information about how to join or enter your email below for a free SPARKworks lesson from the membership!

Want to learn more? Check out the below links for books, websites, and lesson plans about Northwest Coast Indian art. Please note, this post includes Amazon affiliate links. As an Amazon Associate I earn from qualifying purchases.

Northwest Coast Indian Art Books

  • Northwest Coast Indian Art: An Analysis of Form
  • How the Raven Stole the Sun
  • Raven: A Trickster Tale from the Pacific Northwest
  • The Frog Princess: A Tlingit Legend from Alaska
  • Learn the Alphabet with Northwest Coast Native Art
  • Learn to Count with Northwest Coast Native Art

Northwest Coast Indian Art Websites

  • American Indians of the Pacific Northwest Collection of the University of Washington Library — lots of great information and images
  • More Artworks from Northwest Coast people

Northwest Coast Indian Art Lesson Plans

  • Drawing Lesson — This drawing lesson is based on the tale, How the Raven Stole the Sun.
  • Haida Lessons focusing on Identity
  • More Northwest Coast Lessons — This page has many links to lessons.

Filed Under: Art and Artists


October 26, 2015 2 Comments

5 Artworks to Pair with 5 Great Books

The Art Curator for Kids - 5 Great Artworks that Pair with 5 Great Books

Okay, after talking about art and book pairings in my Artwork of the Week post last week, I started thinking about other recent books I’ve read and thinking about artworks that could go with them. This post is not really art education for kids, but I hope you adults find it interesting! I’d love to hear your book/art pairing ideas in the comments as well!

The Art Curator for Kids - 5 Great Artworks that Pair with 5 Great Books

Here are 5 great books I have read recently along with an artwork that goes with each.

Please note, this post includes Amazon affiliate links. As an Amazon Associate I earn from qualifying purchases.

A Surreal World

1Q84 by Haruki Murakami

1Q84 is not a book I would normally have picked up, but two of my friends had read it and said they loved it, so I went with it. I am so glad I did. The 952 pages of this book tell a beautiful love story that is filled with enigmas and things that don’t make any sense. By the end of the book, nothing will shock you about the story because you are so used to this fanciful alternate world and its mysteries.

The Art Curator for Kids - Books with Art - 1Q84 and Magritte
René Magritte, The Empire of Lights, 1953-54

Magritte’s The Empire of Lights came immediately to mind when coming up with an artwork to pair with this book. Just like 1Q84, at first glance, the picture makes sense but as you look, you see it is both night and day. This looks like it might be a place with two moons. If you read 1Q84, you’ll know what I am talking about.

Art Symbolizing Self and Country

A Thousand Splendid Suns by Khaled Hosseini

Oh, this book. This book. Drop everything and read it right now. It’s an incredible tale of two women in Afghanistan. Not only did I learn a ton about the history of Afghanistan (knowledge I was shamefully severely lacking), it is such a beautiful, heartbreaking, and heartwarming story. This one will stick with me for a long time.

The Art Curator for Kids - Books with Art - A Thousand Splendid Suns and Buddha of Bamiyan
Photo Credit: Marco Bonavoglia

The art choice is obvious with this one. Carved in the side of a cliff in Afghanistan with details made from mud and straw, the Buddhas of Bamiyan were monumental sculptures of the standing Buddha dating back to the 6th century. In March of 2001, the Taliban proclaimed them to be idols and blew them up. In A Thousand Splendid Suns, one of the main characters visits the sculptures with her father, and Hosseini uses the sculptures to connect the travesties in this girl’s life with Afghanistan’s suffering as a whole.

Sublime Nature

Wild: From Lost to Found on the Pacific Crest Trail by Cheryl Strayed

I’m sure you have heard of this book. Cheryl Strayed tells the story of how after dealing with the death of her mother and failure of her marriage, she set out to hike the 1,100 miles of the Pacific Coast Trail. I really loved this book, and while I don’t think it made me want to walk 1,000 miles, it did make me think about life and what it means to live an authentic life and be connected with the world and myself in different ways.

The Art Curator for Kids - Books with Art - Wild and Thomas Moran
Thomas Moran, The Grand Canyon of the Yellowstone, 1872

I almost chose Wanderer Above the Sea of Fog by Caspar David Friedrich for this one, but I think it places the man as too big in relationship with nature. He looks too clean. I can’t imagine that guy with his toenails falling off because of too-small boots. Instead, I’m going with Thomas Moran’s The Grand Canyon of the Yellowstone (I’ve written about this one before.) He captures the majesty of the American West, but I also like how he has included some people in the picture to show the vastness of nature compared with the smallness of man.

Simple Magic

The Night Circus by Erin Morgenstern

I like this book, but my favorite part of it was that is was narrated in the audio version by Jim Dale, so I almost felt like I was listening to Harry Potter again. This book is about a magical “Circus of Dreams” that is only open at night. The two protagonists fill the circus with magical feats and spectacles, and Morgenstern describes them so you feel like you are there. This book is both sweet and weird.

The Art Curator for Kids - Books with Art - The Night Circus and Picasso
Pablo Picasso, Acrobat, 1930

I’ve chosen Pablo Picasso’s Acrobat from 1930 to pair with this book. The color theme of The Night Circus is all black and white, and the simplicity and impossibility of Picasso’s figure pair well with the magic of The Night Circus.

Mysterious Eccentricity

Where’d You Go, Bernadette by Maria Semple
This was a fun, quick read about an eccentric, reclusive mom who suddenly disappears and her daughter’s quest to find her. The mom was a famous architect in the book, and I especially enjoyed the author’s thoughts about the nature of creativity and how artists must continue to create and what happens if they don’t.

The Art Curator for Kids - Books with Art - Where'd You Go, Bernadette and Cindy Sherman
Cindy Sherman, Untitled Film Still #5, 1977

I knew I wanted to choose a Cindy Sherman artwork for this because her Untitled Film Still’s seem to connect with the character of Bernadette. These artworks have mysterious elements to them. They are stills in the middle of some other story that you don’t have all of the information about, so they make you think and wonder. Bernadette’s character is mostly told through letters she has written so this artwork seemed to be a good fit for me. Looking at this woman, we wonder what is happening, what do those letters say, what is she thinking, and who is she looking at?

Okay, I had great fun writing this post and thinking about art in this way! I have a feeling this week becomes a series. Share your art/book pairings in the comments!

If you want to connect with me more through books, go here to friend me on Goodreads!

Filed Under: Art and Artists, Downloads and Resources


October 22, 2015 Leave a Comment

Analyzing Presidential Campaign Commercials: A Visual Culture Lesson Plan

The Art Curator for Kids - Analyzing Presidential Campaign Commercials - A Visual Culture Lesson Plan for High School

When I was in grad school for Art Education, I took a class on Visual Culture. I really enjoyed the class and thinking outside of the box when it comes to defining what art is and what should be taught in an art class.

During that semester, there was an amazing exhibit at the Sixth Floor Museum in Dallas called The Living Room Candidate: Presidential Campaign Commercials 1952-2004 by The Museum of the Moving Image. I was fascinated by the exhibit and thought it was a perfect subject for my semester project. All of these campaign commercials are also online in a virtual exhibit, so this an excellent way to teach students how to decipher propaganda and how images and language can be used to manipulate emotion.

The Art Curator for Kids - Analyzing Presidential Campaign Commercials - A Visual Culture Lesson Plan for High School

Here is the lesson I created back in grad school in 2005 (edited a bit). This is in full lesson plan format, which I don’t usually do (because I HATE WRITING LESSON PLANS! lol), but I had to do it in grad school, so it was mostly done. This was part of a larger unit about “United States Patriotism in Times of War.” Maybe I’ll put up the other lessons from the unit sometime too. Let me know in the comments if you are interested in the rest.

Grade Level: High School

Time: 9 class periods

Overview of Lesson:

Presidential campaign commercials have an impact on the public by not only inspiring votes but also inspiring patriotism, especially in times of war. Students will discover commonalities and differences in the history of campaign commercials from 1952-2012 by visiting the online exhibit, The Living Room Candidate: Presidential Campaign Commercials 1952-2012, examining and comparing war-themed commercials, and using what they learned to create a storyboard of their own campaign commercial.

Key Concepts:

  • The President, being the commander and chief of the army and the leader of the country, has the responsibility of uniting the country and inspiring patriotism.
  • The language, music, and imagery in campaign commercials can be analyzed to uncover manipulative techniques and ways of inspiring patriotism and evoking emotion (pathos).

Essential Questions:

  • What visual, musical, and verbal messages do presidential campaign commercials project?
  • How do presidential campaign commercials inspire patriotism?

Learning Objectives:

  • Students will learn how to view presidential campaign commercials critically to analyze the different elements (words, music, and imagery) used to influence the audience.
  • Students will learn how presidents used patriotism in their campaign commercials.
  • Students will learn how political commercials have changed in the past 52 years.
  • Students will learn about the elements of a storyboard and the process of creating a storyboard.

Performance Objectives:

  • Students visit the online exhibition, The Living Room Candidate: Presidential Campaign Commercials 1952-2012, and reflect on the history, nature, and techniques of political campaign commercials.
  • Students will use their reflections to plan and write their own political campaign commercials.
  • Students will create a storyboard of their political campaign commercial

Resources:

  • The Living Room Candidate: Presidential Campaign Commercials 1952-2012

Materials:

  • Computer access for each student with internet and video streaming capabilities
  • 1 16”x20” sheet of black mat board per student
  • 11 sheets of 4.25” x 5.5” paper per student
  • pencils, pen, and ink in various colors

Procedure:

Day One: Online Exhibition (Homework or In-Class)

Preparations:

Before giving the assignment, give the students topics to consider when viewing the online exhibition. These topics may include: differences and commonalities of the earliest and the most recent commercials, commonalities in imagery and music, aesthetic quality and artistry of commercials, evoking emotion or pathos, and ways campaign commercials depict the values of the public.

Exhibition Visit and Writing Assignment:

The students will visit the online exhibition, The Living Room Candidate: Presidential Campaign Commercials 1952-2012. Invite students to explore and experience the exhibition on their own. This can be done as homework or in the computer lab at school. Invite students to document their ideas and observation in their notebooks or sketchbooks.

Ask students to write a 1-2 page reflective response based on their museum experience. Encourage them to consider what they enjoyed most and what surprised them.

Day Two: Class Discussion

Engage students in a discussion about the exhibit experience.

Discussion motivators:

  • How have the commercials changed since 1952?
  • Which videos did you like best?
  • What common themes emerged among the commercials?
  • What recurring imagery did you notice?
  • How does sound contribute to the commercials? How did the music and the voices sound?

Show Ronald Reagan’s commercial Peace from 1984 and discuss the commercial as a class.

  • Describe the emotional response you felt while viewing this commercial?
  • What elements of the commercial contributed to that emotional response?
  • Define and discuss the term, pathos, in regards to the commercial.
  • What imagery was prevalent in the commercial?
  • How does the imagery inspire patriotism?
  • What language does Reagan use in the commercial? Replay.
  • How does the language inspire patriotism?

Show George W. Bush’s commercial Dangerous World from 2000 and discuss.

  • What emotion does this inspire?
  • How does Bush evoke fear?
  • What is the message in this commercial?
  • How does this commercial differ from Reagan’s?
  • What imagery is similar to Reagan’s? What is different?
  • Why would both Bush and Reagan include children in their ads?
  • How does the patriotism projected in this commercial differ than the patriotism inspired in Reagan’s?

These questions hopefully will lead to the discussion of using fear and using pride to evoke patriotic feelings.

Show Lyndon B. Johnson’s commercial Peace Little Girl (Daisy) from 1964.

  • Have students quietly reflect on this commercial in writing and then share their thoughts with the class.

Day Three: Exploration

Introduction to Assignment:

The students are required to create a storyboard for their own 45-second political campaign commercial. Students will use the inspiration and ideas generated from viewing various presidential commercials to write a script for a political campaign commercial and draw 9 pen and ink sketches of possible screenshots on 4.25” x 5.5” watercolor paper (8.5” x 11” paper cut into fourths). Each drawing should represent about 5 seconds of hypothetical footage. Elements such as perspective (i.e. close-ups), screen text, and music cues should be considered. Once completed, students will mount the 9 sketches with accompanying text (handwritten on strips of watercolor paper or onto the drawing itself) of any voiceovers or speaking onto a piece of 16” x 20” black mat board with rubber cement.

Explorations:

Invite students to visit the online version of The Living Room Candidate and explore the commercials located in the themed sections of “war” and “fear.” The “war” section is located by clicking “issues” on the left of the screen and then clicking “war.” The “fear” section can be found by clicking “type of commercial” and subsequently selecting “fear.” Allow students time to explore and take notes on commercial elements that may inspire ideas for their assignments.

Day Four: Concept Building

Brainstorming and Drafting:

Students must first create the script or sequence before beginning to create the images. After the writing process is complete, students must have at least one set of thumbnail images before progressing to the watercolor paper.

Days Five-Nine: Studio Production

After the brainstorming and thumbnails have been completed, allow students to experiment with the medium before beginning the official sketches. Demonstrate different techniques of applying ink such as using variations of pen nibs, adding water to colored ink to change the value, and using a paintbrush effectively for the medium. The medium is unforgiving so invite students to sketch the image onto the paper with a pencil before applying the ink.

Vocabulary:

  • Patriotism: “love of country, devotion to the welfare of one’s country, the passion which inspires one to serve one’s country.” (http://dictionary.com)
  • Pathos: “a style that has the power to evoke feelings” (http://dictionary.com)
  • Storyboard: “A panel or series of panels of rough sketches outlining the scene sequence and major changes of action or plot in a production to be shot on film or video.” (http://dictionary.com)

Evaluation:

Students will be evaluated based on the following criteria:

  • Participation: attentiveness and participation during class discussions and online exhibition visit
  • Writing Activity: completion of the essay as assigned, evidence of engagement and thoughtfulness in the viewing of the commercials
  • Storyboard: completion of thumbnail sketches and planning, craftsmanship in sketches and presentation, incorporation and understanding of class discussion into the final product, student commercial designed to invoke emotional response as well as has a strong and clear statement

Interdisciplinary Connections and Extensions:

Connections to Social Studies, Theatre, Language Arts, and Government are included in this lesson.

Filed Under: Art and Artists


October 20, 2015 2 Comments

Artwork of the Week: The Goldfinch

The Art Curator for Kids - The Goldfinch by Carel Fabritius

Please note, this post includes Amazon affiliate links. As an Amazon Associate I earn from qualifying purchases.

Hello! I’m sorry I haven’t posted much on the blog in the last two weeks. I’ve been traveling and enjoying a little time off! I’m picking my Artwork of the Week this week based on what I am reading again. It is kind of fun to pair books and artworks! I am currently in the middle of The Goldfinch (which I recommend so far! It’s maybe a bit longer than it should be, but I am enjoying it.)

The Art Curator for Kids - The Goldfinch by Carel Fabritius

The book centers around a 17th-century painting from artist Carel Fabritius called The Goldfinch. Throughout most of the book, I assumed the painting was a fictional work, and I was delighted to learn it is not. It is interesting, because I have spent a lot of time imagining it while reading, and it doesn’t really look like I pictured. I imagined a dark brown background with more reds and golds like Rembrandt who was a teacher of Fabritius.

Carel Fabritius, The Goldfinch, 1654

In the trompe l’oeil (“trick of the eye”) painting, a goldfinch bird has a chain from his leg to a bar attached to a wooden box. The book talks about the painting as a symbol for mortality, and the protagonist of the book is chained to this painting much like the bird is chained to this box.

We don’t have many artworks by this artist because he died young in an explosion near his home. Visit the Frick’s website to hear an audio recording that discusses this painting more.

Filed Under: Art and Artists
Tagged With: carel fabritius


October 13, 2015 6 Comments

5 Artworks to Promote Introspection

The Art Curator for Kids - 5 Artworks to Promote Introspection - Journal Art.2
The Art Curator for Kids - 5 Artworks to Promote Introspection - Journal Art

Welcome back to my Art Round-Up series where I curate groups of paintings around themes for use in your home or classroom. Each post, I will pick 5 artworks that you could start discussing today with your kids. Today’s topic is artwork to promote introspection. These are great artworks to sit down with and use as inspiration to write in your journal.

Also, check out this post on how to look at art with kids for tips on discussion artworks.

Note about the images in this series: Because of copyright law, I cannot include pictures of all the works discussed. Instead, I have included low-quality thumbnails for reference and commentary. For full versions of those works protected under the law, please click the link or picture to find the image.

Recommended Age: All ages can do this in some form.

1. Shen Zhou, Poet on a Mountaintop, c. 1500

curated homeschool art Poet on a Mountaintop by Shen Zhou. c. 1500
Shen Zhou, Poet on a Mountaintop, c. 1500

This is a Chinese brush painting from the Ming dynasty. Artists in this style used only black ink and water as a way to focus on artistic expression in other ways. They used a variety of different types of expressive brushstrokes in a range of values (lights and darks) from white to black. You’ll notice the people are very small in comparison with the surroundings which connects with their Buddhist beliefs that humans are a small part of nature. They created exaggerated landscapes to reinforce this idea.

Get the Full Lesson!

This Lesson is in The Curated Connections Library!

Find the full lesson from this post along with hundreds of other art teaching resources and trainings in the Curated Connections Library. Click here for more information about how to join or enter your email below for a free SPARKworks lesson from the membership!

Join the List

Get the Full Lesson!

This Lesson is in The Curated Connections Library!

Find the full lesson from this post along with hundreds of other art teaching resources and trainings in the Curated Connections Library. Click here for more information about how to join or enter your email below for a free SPARKworks lesson from the membership!

Journal Prompts: Imagine you are in this place. What do you see, smell, and hear? What would it feel like to be in this place? How would it feel to step out of your day-to-day life and away from the conveniences and technology you use? How might you feel differently about the world after experiencing this place?

2. Pablo Picasso, Girl Before a Mirror, 1932

Pablo Picasso, Girl Before a Mirror, 1932 (click to see image larger)

This is my probably favorite painting, although that is a hard choice (I love all my babies the same). This certainly is the artwork that has had the biggest impact on me. It made me weep for some reason and change the whole course of my life at that moment in time. Picasso believed his paintings should speak for themselves. I will tell you my own personal interpretation of this painting, but you are free to make your own. To me, this is a regular girl on the outside, nondescript.  She looks into the mirror and sees her inner self reflected in turmoil and pain.  It’s twisted and dark with hot orange tears.  The girl in the mirror is shy, but she has a story to tell.  She wants out, but is feeling pulled into herself.  The girl before the mirror is reaching towards the mirror to connect with and soothe the girl on the inside.  She wants to free the girl in the mirror and make her heard.

Journal Prompts: What does this girl see when she looks in the mirror? Is she hiding something from the outside world? If so, what is she hiding? What emotions do you experience in this artwork (either by you or the girl in the painting)? How do you personally relate to/connect with this picture? What do you see when you look in the mirror? How are you different when alone than when you are with others? What does this painting say about the world in which we live?


Check out these Girl Before a Mirror products. Please note, this post includes Amazon affiliate links. As an Amazon Associate I earn from qualifying purchases.

  • Pablo Picasso: Girl before a Mirror (One on One) – A book just about this painting alone
  • 16×20 Poster Print or 11×14 Framed Poster Print

3. Nude Woman (Venus of Willendorf), c. 28,000 B.C.E – 25,000 B.C.E.

curated homeschool art Willendorf-Venus-1468 photo credit don hitchcock
Nude Woman (Venus of Willendorf), c. 28,000 B.C.E – 25,000 B.C.E., Photo Credit: Don Hitchcock

Meet “Venus of Willendorf.” I’m sure you have seen her before. She was made by paleolithic people about 26,000 to 30,000 years ago. Stop a minute and think about how long ago that was. Yeah. Wow. We know very little about her because she was made before writing and before formal history. Her name was given to her much later; we have no reason to believe she is an actual goddess. We can make guesses though. We guess that she is in some way connected to fertility. Why do you reckon we think that? All of the parts of her that are related to childbirth are exaggerated while all of the other parts like feet, hands, and face are small and non-functional. She is only about 4.25 inches tall and is one of many of these types of sculptures found from this time period.

I think she is a good starting point for journaling to put your life and where you are in this moment in perspective. Thinking about the span of your life in the scale 30,000 years makes you more connected with all the people who have lived before you. You can also look at this and think about how drastically different our lives are today and imagine what it would be like to live in another time. Also, what will be left of your life when archaeologists look back on it in thousands of year?

Journal Prompts: What was your first reaction to this sculpture? Why do you think you had the reaction? This was created about 27,000 years ago. How does that make you feel? What does that call to mind? What will be left of your life when archaeologists look back on it in thousands of year? What will they know about you from what you leave behind?


Click here for a great YouTube video from the Khan Academy’s “Smarthistory” series about this sculpture.

4. Candy Chang, Before I Die, 2011+

Candy Chang, Before I Die, 2011
Candy Chang, Before I Die, 2011, (click to see larger)

In 2009, the Candy Chang lost someone very close to her suddenly, and it inspired her to think about life and what is most important to her. In response, she converted an old building in New Orleans to an interactive public art piece by making a big wall into a chalkboard with the phrase “Before I die…” written on it many times with blank lines following. Within days, the wall was filled with inspirational goals and aspirations by the people walking by. It became a place to reflect on goals and connect people together. Now, there are walls all over the world with the same message and a book about the experience.

It's about making space for reflection and contemplation and remembering what really matters most to us as we grow and change. -- Candy Chang, Artist
Journal Prompts: Before I die…


Click here for the artist’s incredibly moving TED Talk about this piece.

Buy the book (Before I Die *Amazon Affiliate link)!

5. Do-Ho Suh, Floor, 1997-2000

Do-Ho Suh, Floor
Do-Ho Suh, Floor, 1997-2000, (click to see larger)

If you were to happen upon this artwork at the Indianapolis Museum of Art, or at the 2001 Venice Biennale where I has the great pleasure of visiting,  you would see a glass floor with many colored dots underneath. As you get closer you notice that hundreds or little plastic action figures of everyday people hold up the weight of you and the glass floor. Walking on top of these people you might think about the power of community–how the individual is small but the collective is powerful. You might think about all the people who support you in your day to day life who go unseen–from the people across the world who make your clothes or the men and women who pick up your weekly trash.

Journal Prompts: How do you rely on other people in your life? What can you accomplish as a group than you couldn’t alone? How important is community in your life?

Here’s a video discussing this artwork. (Side note: Nerdfighters may recognize the person in this video!)

Also, Season 2, episode 1 of art:21 discusses the work of Do-Ho Suh (Here is a link to this episode).

Thanks for reading! Think about one of these artworks in relationship to your life. Please share a personal connection you had with the art in the comments!

This post was originally published on May 28, 2014.

Filed Under: Art and Artists, Downloads and Resources
Tagged With: candy chang, do-ho suh, pablo picasso, shen zhou


October 9, 2015 4 Comments

Art Teacher Tips: How do you grade art?

The Art Curator for Kids - Art Teacher Tips - How do you grade art

I recently received a question from a reader that I didn’t have a great answer to. Charlotte P asked:

Hi Cindy, I am an art teacher in a charter school in St. Louis, MO. I love your website and all of the information that you have so lovingly shared with fellow art teachers. I am looking for a great way to measure progress with students. I thought of letting them grade themselves on craftsmanship, creativity, participation, and effort. These are vague-ish. I do think that each one is important and maybe I should focus on one at a time…I see students once a week for 50 minutes. I think they forget a lot of what we do together, but maybe if I focus on one goal for an extended amount of time? I want to make it engaging and valuable to them. What are your ideas?

When I taught elementary, I had this same struggle, and I never really did develop a great system for this. I decided to put the question out to you guys in a recent e-mail newsletter, on the Art History Teachers Facebook Group, and on my Facebook page, and I got some awesome responses! Thanks so much to everyone who responded. I went ahead and just copied the quotes directly since the ideas were so great!

The Art Curator for Kids - Art Teacher Tips - How do you grade art

How do you grade art? Hear ideas straight from these awesome art teachers!

Defining Effort

I teach 5th grade through 12th only two hours per week. (Mon & Tues 5th-6th, then 7-8th, then 9-12th). It is difficult to get a lot done with such minimal time but we ‘mostly’ work hard. I grade based on 1) Following instructions and 2) Effort. Effort includes craftsmanship and creativity. A student being careful, thoughtful, and/or creative shows effort of craftsmanship and the students understand this.

Student grades also include their sketchbooks which is 1/4 of their overall grade. Sketchbooks are homework although they all use them at the beginning of classes for a warm-up.

We sometimes use the “glow” “grow” method of critiquing each other’s work which looks promising for increasing effort.

Angie D.

Changing your Method as Students Age

A great deal of an art grade is the age of the child and your goals for the class. Young children simply need to be encouraged to create, not focus on technique. If a young child puts a great effort on it, score high. It does not matter what it looks like. As they age, there are more specific learning goals to art, some should be technical knowledge of the subject matter, which can be tested objectively. Then technique comes into play, and a scale of mastery should be established. That being said, the effort put forth by the student should weigh in the final grade. A student who makes every effort to learn and improve should see that effort reflected in his grade.

Beth D.

Art is MORE than Production

Here ya go how I grade art:

1) Too much of an art grade (and most rubrics posted out there) focus on art producing only and no art appreciation, observation, or curating is measured in the art grade as a variety of visual intelligence should be recognized.

2) Creating, responding, presenting (aka curating), and connecting are all in the national core standards (see attachments) for assessments and teaching.

Although most faculty and parents at my school think I only grade on production because they don’t understand why presenting, responding, and connecting to art at a K-5th level is important. Regardless of there opinions I take presenting, responding, and connection into consideration. THIS MEANS I have to teach a program that children can use variations on visual intelligence in my class. I’m hoping that when my kids (both born to me and the ones I teach) become parent they will beg their child’s art teacher to make it part of their child’s art assessments and curriculum.

Chloe P., K-5 Art in Los Angeles

Point System

I grade on a point system. 10 points for demonstrating their understanding of the concept taught. 10 points for following the instructions. 5 points for creative thinking (I don’t want all projects to look the same).

Amber B., PreK-7th Art

A Simple Rubric

I use a rubric for their projects. Sketchbook activities get a daily grade of 95. I do this because 1: they did the work and 2: there’s always room for improvement. The rubric I use is pretty generic but I add a few things. I always tell my kids what I’m expecting to see first so there are no surprises.

Heather R, 6th grade Art

Following Instructions without Squelching Creativity

I grade primarily on effort and whether or not the basic instructions have been followed. However, sometimes a student will deviate from the project requirements and create something amazing–so should I give them a “bad grade” when their artwork is better because of this? I don’t believe so. Grading and teaching art are problematic for me, and I’ve been teaching for almost twenty years. I want to encourage kids’ creativity, not squelch it.

Amy J.

The Subjectivity of Art

I don’t grade every piece of art we create, especially in Kinder and First grade. Some art should just be about expression. When I do grade art, I discuss with the students what skills I am specifically teaching and assessing–shading, line work, perspective, etc. They know what’s optional and what’s non-negotiable. Then, I grade on a rubric and follow it as best I can.

Of course, all art grading is somewhat subjective. Johnny may have created the best work he’s ever done, and it’s still not as good as Jane or Juan’s. I have to look at that student’s progress almost as much as the final product. You have to reward process, hard work, and diligence–maybe even more than natural ability. I want that struggling student to know that he or she can get better. I want them to see the benefit of effort.

Also, I write down scores on a clipboard to keep for my records. I don’t write a score on the art itself, even on the back. Yes, Harry deserved a C, but twenty years from now, he won’t remember why. He and his momma will just see a grade on a precious memory, and that will mar it. And, I will be the jerk art teacher who gave that poor baby a C…..

Georgia

Process or Product?

I try to leave out the subjective types of grading and look for things I can grade concretely. For example, if we are doing a sculpture, I can grade whether or not the arms and legs stayed together and attached.

Grading this way made it easier to explain to parents their child’s grade on a Rubric but did not satisfy a full grade in art for me. So now I try to give about 3 grades per project in my upper-grade levels. The first has to do with planning work, uniqueness, and design, the second has to do with craftsmanship and the third has to do with writing about the artistic process (Artists habit of mind). I have a rubric that all students fill out at the end of a project that reminds them of the entire process they just experienced. I feel too often we (administrators, parents, and teachers) forget it is the process that counts and not always the final product. I feel since students show their strengths in different ways, by giving multiple grades, they have the opportunity to see what areas they excel in, as well as need improvement.

Patti K.

Standards-Based Grading

Here at Pinedale Elementary in Pinedale Wyoming we are moving to a standards-based report card for the classroom teachers. Our scoring at each standard/benchmark is on a range of 1-4. Four being exceeds standards, three being proficient, two we call developing and 1 is basic. Also, we no longer average scores, but report the highest level that the student has attained. That being said – our specialists are still allotted only one box on the report card, so even though we assess several standards, we must crunch our assessments down into one-quarter score.

And that’s fine with me. I feel that art at the elementary level should be about exposure, experimentation, and exploration. If a fifth-grader isn’t developmentally ready to grasp the concept of one-point perspective, does that mean he should not be considered “proficient?” I think no. If I student is willing to engage with the media and concepts presented, I call that kid proficient, regardless of ability. If skill, effort, or natural ability show her to be above what I might expect from the average fifth grader, I call her “advanced”. A number 2 and below I reserve for the kid who shows up but refuses to engage, or simply isn’t present for enough sessions to do the work.

To me, even at an adult level, great art is about engaging with concepts and media. Draftsmanship, knowledge of vocabulary, facility with a paintbrush, etc. are helpful, but not the critical thing.

I staunchly resist the “measurable” criterion in student assessment, as I feel it doesn’t really help anything when applied to visual art, except as a gauge of my own teaching.

Cristy A.

District-Made Rubrics

For elementary, my district has a pretty clear rubric that addresses materials handling and behavior (following directions, staying on task, etc.). I create my own rubrics for grades 6-12 which address whether students have demonstrated the required skills (yes, no, or partially). The grade corresponds to how the student scored on the rubric.

Liliana G.. 6-8 Art in Portland, OR

Specific Criteria per Project

I give my students the grading criteria with each project. I am looking for specifics with each project. There are ones that are on most lists: use of picture plane or composition and craftsmanship.

Debbie N.

4-Part Criteria

This is something that I really struggle with!! As a high school trained teacher teaching primary art I often think I am not doing enough / doing too much in terms of assessment and I’d love help and to discover the ways other art teachers approach this aspect of our job.

The way I do it is, I will normally discuss the criteria for an artwork with the kids and write it down on the board as we go. I will refer to these criteria several times throughout the process of creating the artwork. After the kids have completed their art-making I need to get onto assessing it straight away, I use a simple rubric that has 4 aspects (1. did the artwork meet the criteria, 2. how successful was the craftsmanship, 3. was the approach to art-making creative, 4. how was the student’s behavior during the process). I then award the student with an A, B, or C and very rarely a D. However these grades do not go to the student, they are kept for my reporting. I do give the students verbal feedback throughout the whole process and aim to give them all written feedback with the rubric after I’ve assessed their artwork.

Anyway… I have no idea sometimes if I am on the right track!! Sometimes it feels really effective, and other times not so effective, so would love to share ideas on this one.

Phoebe B.

Self-Reflection

I used the Studio Habits of Mind to created a complex rubric for students to self-critique, followed by a few questions to aid in reflecting on both the process and their product. I have three basic forms k-2, 3-5, 6-8th, and adjust as needed for each project. It took many hours to formulate but already establishing a culture that communicates art-making is a creative and academic endeavor.

Sarah M.

What NOT to do

I don’t actually grade art in my position (our classes are taught as just for fun) but I do have a funny story. My boyfriend had an art teacher in grade school that would seriously grade works as “P” for pretty or “NP” for not pretty. I thought it was funny but definitely not the way to go. He was crushed a couple of times with a big “NP.”

Laura S.

Thanks to everyone who shared your strategies with us!

Filed Under: Art Teacher Tips


  • Previous Page
  • Page 1
  • Interim pages omitted …
  • Page 22
  • Page 23
  • Page 24
  • Page 25
  • Page 26
  • Interim pages omitted …
  • Page 38
  • Next Page

Primary Sidebar

Hi! I’m Cindy Ingram, the creator of Art Class Curator and The Curated Connections Library

I’m on a mission to revolutionize education with the power of life-changing art connections. Art is not “extra”. Art is essential. We are empowering teachers to bridge the gap between art making and art connection, kindling a passion for art that will transform generations.

More About Me

Free Worksheets!

-Free Bundle of Art Appreciation Worksheets-

In this free bundle of art worksheets, you receive six ready-to-use art worksheets with looking activities designed to work with almost any work of art.

Download

Free Worksheets!

-Free Bundle of Art Appreciation Worksheets-

In this free bundle of art worksheets, you receive six ready-to-use art worksheets with looking activities designed to work with almost any work of art.

Enrollment in Curated Connections Library is currently open. Click here to join. Join our list to get more information and to get a free lesson from the vault! If you are purchasing for a school or school district, head over here for more information.

Check Out What’s New In The Shop

Experience Art: Engaging Art Criticism Discussions and Activities for Teachers and Students of All Ages
Call to Art: An Un-Conference for Art Educators
Curated Connections Library Membership
Perspectives High School Curriculum

More Products

Have You Listened to the Latest Podcast Episode?

Falling for Naudline Pierre’s Evocative Art: A Conversation with Madalyn (Part 2)

More Episodes

Testimonials

I like how this program, unlike other art class resource membership programs, feels authentic. It's like art matters more here, and not fancy flash-in-the-pan trendiness. The goal of Art Class Curator seemed to be helping kids develop a lifelong love and art appreciation versus "Hey, look. I painted this fish."
Erin A.
Your questions are helping me to delve into much deeper learning, and my students are getting better at discussion-and then, making connections in their own work. Art Class Curator is awesome!
Denise W.
Interestingly, my lower performing classes really get engaged in these [lessons] and come away with some profound thoughts!
Melissa G.
I had the most amazing 6th grade class today. They were jumping out of their seats with hands raised just to respond and give input. It was as if I was waving candy in front of them! They saw more and more and the ideas and interpretations unfolded. So cool!!! This is what makes teaching art so wonderful – thank you!!
Caroline G.
I just wanted to thank you for the invaluable resource you have through Art Class Curator. Not only do you have thought provoking activities and discussion prompts, but it saves me so much time in preparing things for myself! I feel like I’ve only scratched the surface with your site.
Maryjane F.

Get Art Inspiration To Your Inbox!

Enter your email address to get regular art inspiration to your inbox
plus a BUNDLE OF 6 FREE WORKSHEETS!
We hate SPAM and promise to keep your email address safe.
Download

Free Worksheets!

*Free Bundle of Art Appreciation Worksheets*

In this free bundle of art worksheets, you receive six ready-to-use art worksheets with looking activities designed to work with almost any work of art.

Copyright © 2026 Ignite Art, LLC DBA Art Class Curator •  All rights reserved  •  Privacy Policy  •  Terms of Service  •  Site Design by Emily White Designs