

Block printing is one of my favorite things to do with kids (and with myself for that matter, who needs a kid to have fun with art?). Later in the week, I will be featuring some Japanese woodblock prints as part of my Art Spotlight series, so in preparation for that, I will show you some ways to make block prints at home.
Please note, this post includes Amazon affiliate links. As an Amazon Associate I earn from qualifying purchases.
Free PDF!
Printmaking Instructions
Display, print, or laminate these instructions to show students each step in the printmaking process.
What is a Block Print?

You can think of a block print kind of like a homemade stamp. You take a material like wood (“woodcut”) or linoleum (“linocut”) and carve away every part of the image you want to be white (or whatever color your paper happens to be). Professional printers from throughout art history use layered color and precise tools to make beautiful and detailed works, and you and your students can too using the processes I describe below. Although it is possible to make a print with multiple colors, I recommend starting with one color. There are lots of ways to make block prints at home with your kids, and I will focus on two types here in this post: foam printing and linocut printing.
Foam Printing
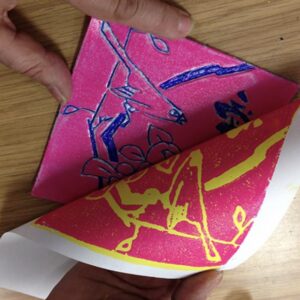
Foam printing involves drawing deep lines into Styrofoam and using ink or paint to transfer this image onto paper. This is the cheapest way to do a block print and the safest and most accessible for young children. One way is just taking a Styrofoam plate, cutting off the rim so you end up with a flat disk, and carving/drawing on it with a dull pencil, a stick, or a ballpoint pen. Make sure the lines you draw are pressed deep into the foam for the best results. Next, spread printing ink (or even some tempera paint thinned just a bit with some water) over the surface of the foam using a paintbrush or roller (see more tips about spreading the ink below). Then put your paper on top, press down over the whole surface of the paper with the back of a spoon or a roller, and then lift the paper off.
Try it a few times first so you know exactly the right process before you have the kiddos do it as this can sometimes not work well if you don’t push down hard enough or use paint instead of printing ink. I recommend using ink because the results will be much cleaner! Instead of using a plate, you can also buy packs of foam printing plates for this same purpose in a variety of sizes. You’ll have better results with these and you don’t have to worry about chopping up the plates. See the supplies list at the bottom of this post for recommendations and links.
Linocut Printing
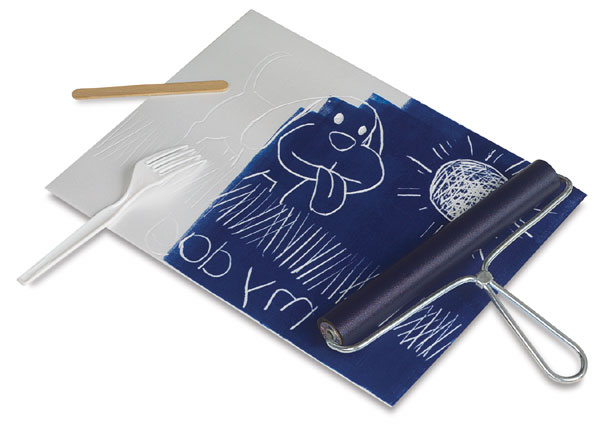
My favorite way of block printing is to use easy-cut rubber blocks that more closely mimic the process of using linoleum and wood but is still easy enough for an elementary-age student to cut (with close supervision). You need some specialized supplies for this, but they are not too pricy and they can be used over and over with the exceptions of the blocks themselves. See a supply list with links at the end of the post.

First, sketch the design onto the print block. You can use transfer paper to transfer a drawing or draw right on the block. Tracing your design in a permanent marker will help you when you start cutting. Also, be sure to do all text and numbers backward as the resulting print is a mirror image. Next, use a linoleum cutter to carve out all of the areas of the design that you want to be white. This tool usually comes with several tips for different thicknesses of lines. If you have a true linoleum block, this will take some muscle. If you have an easy-cut rubber block, it will cut smoothly and quickly, like butter. I’ve had upper elementary age kids use these with little trouble.
Safety Tip: Be sure to push away from your hands and your body when using this tool! I have a nice v-shaped scar on my pointer finger of my left hand from doing this on real linoleum on my bed when I was in college. It wasn’t a smart decision.
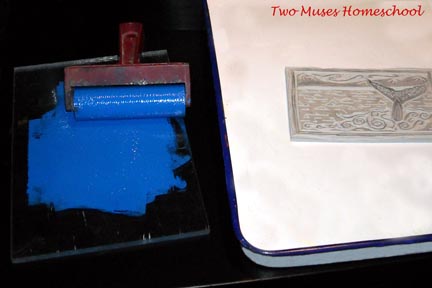
Next, spread some ink on an inking plate, a piece of glass, plexiglass, or anything non-porous and flat. Water-based printing ink is best. You can use tempera or acrylic paint, but it doesn’t work as well. Use a soft roller (or “brayer”) to roll the ink flat. Go in both directions to spread the ink evenly on the roller. Roll the ink onto the print block and then put the paper on top of the block. Use the back of a spoon or a second roller to press the paper onto the block (this is called “burnishing”). Here is a great video that covers the basics of how to ink and print.
Supplies
These are basic art supplies that you can buy at any art supply store, but I have put the Amazon affiliate link for your convenience.
- Foam Printing Plates
- Water-based Printing Ink
- Soft Brayer for Inking
- Linoleum Cutter
- Easy-cut Linoleum Blocks
- Inking Plate/Bench Hook
Like this? Stay tuned for an Art Spotlight post later in the week about Japanese woodblock prints! Let me know if you tried any of this out! I’d love to see your student’s work. Please share your pics below or on twitter.
This post was originally published June 30, 2014.
Wow Cindy! Thank you so much for such a wonderful list of links and how to YouTube clips. I have wanted to do this with my son but didn’t know where to begin!
PS you are the feature for this weeks Virtual Fridge. Let me know if you would like a I was featured button.
Awesome! Thanks so much. Let me know if you try it out. It’s such a fun project. I love seeing the little one’s face when the first print is made. 🙂
Thanks for the feature. Sure, I’d love the button!
Thank you for this detailed post and sharing it with After School Link Up!
You’re welcome!
What a fun activity and I appreciate you sharing options for different age groups and skill levels. Pinning!
Thank you!
Awesome! I did linoncut but getting Little One to do using styroform will be pretty safe and fun! Thanks for sharing!
You’re welcome! I hope it’s a success. It’s always kind of magical pulling the paper off for the first time. 🙂
My dad was an art teacher of lino block printing. We would always put our jute-backed lino tiles in the oven to warm. Cutting out the block was very easy after that.
I cannot imagine trying to cut a cold tile. It just sounds so very dangerous what wit possible slippage… Hope this helps.
Thanks for the tip! We did lino cuts in one of my college classes cold. I didn’t even know there was another way.
Thank you very much for this fantastic post! I do have a question about the clean-up… what do you recommend for clean up that is considered eco-friendly and least expensive? I heard that mineral oil can be used to clean up the brayers, but oil in the environment, washed down the drain isn’t a good or safe idea. I also read that mineral spirits are helpful, but can I throw them away as well? I’d like to teach this in my class, but I’m also very environmentally conscious, and avoid hazardous materials like oil-based, acrylics, and/or too much paper waste. Thank you!
I only use water-based ink! So it just rinses right off. 🙂
I’m really enjoying your posts. Love seeing what other art teachers do and I really appreciate your links and handy hints. Great job! Check out my Facebook page, Art Teacher Life. I’m about to do linocuts using Hokusai’s wave as inspiration.
Thank you! I’ll check it out. 🙂
Hi Cindy,
Art Curator For Kids is so much fun! Great ideas and inspiration. My backround is in fine art. After teaching preschool for almost ten years, I realized that I didn’t want to give up teaching, but I did want to teach art. Currently I have a student who is on the spectrum. Linoleum is one of the first mediums that we worked in (a personal fav of mine). Letsarttogether.com is my website. Thank you for sharing your creativity and enthusiasm!
Thanks! Good luck with your business! 🙂
Hello great website, we shall be working with a high volume of children aged 3-10 just wondering f the process would still work with poster paint?
Hmm, I would test it first. I’m not 100% sure it would. It depends on the quality of the paint, and each is different. I know with blick tempera, it’s a high-quality paint and will work okay, but cheaper paints, they wouldn’t–they will either be too runny or too transparent.
How should I determine the amount of ink needed for styrofoam prints? I have 700 students.
I can think of two options….do a test and do your best to calculate from there, and/or if you are in a teacher Facebook group, ask if anyone has done this project with that many students and they may have a good estimate for how much ink you will need.