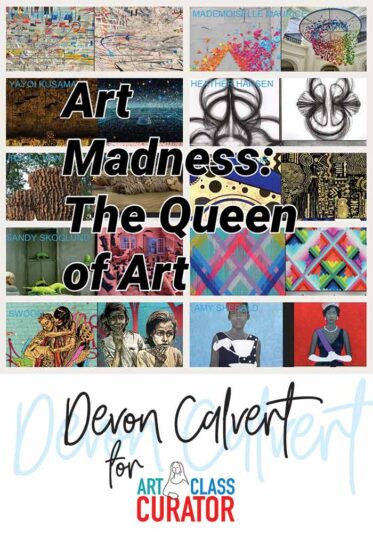
Inside: Art Madness, a tournament style art critiquing activity that exposes students to a variety of artists and allows them to vote for their favorite.
I’m excited to host Devon Calvert from Mr. Calvert’s Art Room today. His inspiring guest post reveals an exciting art critiquing activity that’s sure to get students talking, debating, and enjoying a wide variety of art. Thanks so much, Devon! Be sure to check out his blog for more elementary art education ideas.
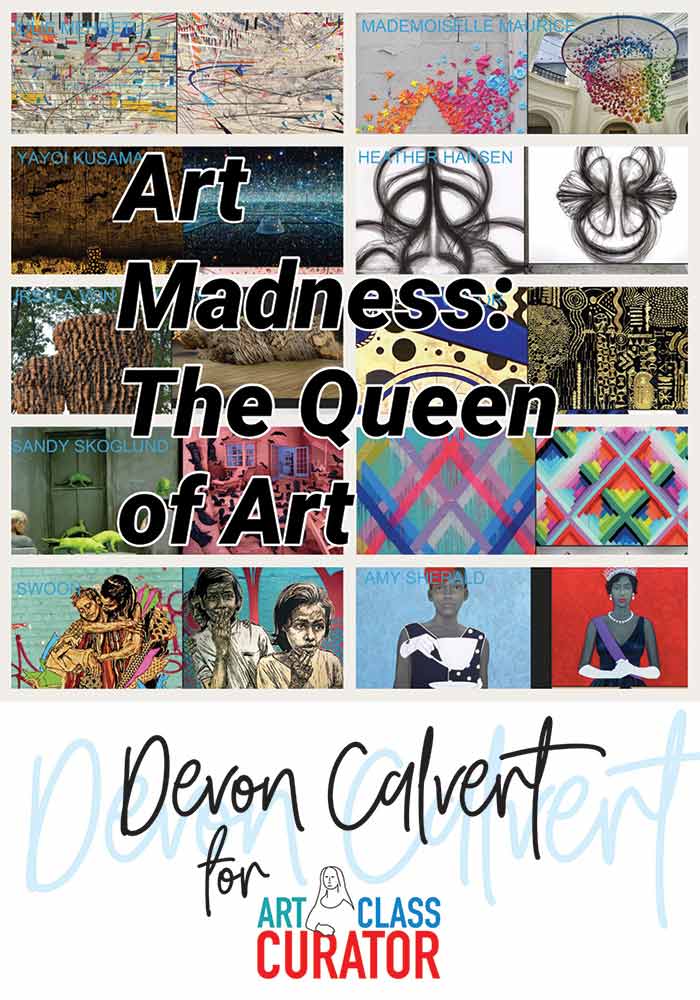
Art Madness is a unit that I do with 3rd graders to get them thinking and talking about art and their opinions of it. My first year of teaching, I found that I wasn’t doing enough critiquing with my students. Rather than just write about artists, I thought that an Art Madness tournament would be an exciting enough event to keep my students interested over an extended period of time. I do it each year in March so that it coincides with the NCAA March Madness tournament. I choose a different theme each year for the tournament. Typically, the theme correlates with the theme of my table-names (Pop Artists, Street Artists, Contemporary Female Artists, etc).
Prep Work
After choosing a theme, I find ten artists that fall under that category. I create a slide in PowerPoint for each artist that shows three examples of that artist’s work. This gives students a chance to see a variety of work. I really like this activity because it offers me the opportunity to talk about artists that I wouldn’t get the chance to teach otherwise.
Before the event begins, I also create a tournament bracket with five artists on each side. Because each side is an odd number, one artist automatically advances to the second round.


Free Download
Art Madness – Empty Bracket
Download a free bracket for your classroom Art Madness competition! This includes a blank 32 artist bracket and a 16 artist bracket. Have fun!
Art Madness: Day One
The first day, I introduce the students to Art Madness. I explain how this is inspired by the NCAA basketball tournament, March Madness. Being from Wisconsin (On Wisconsin!), we typically have a very good basketball team (not this year though, sadly), so my students know a lot about March Madness already. I explain to the students that we will spend the next two classes discussing art and NOT making it. This is usually met with a few groans but they end up loving the activity by the end. Each student is expected to voice their opinion at least once each class. This can be as simple as them saying what they do/don’t like about an artist.
I introduce the first two artists to the students and show them three artworks from each artist. Students then write down on a paper slip the artist that they like better. For the more tech-savvy, you could create a poll on Google Forms for students to fill out instead of using the paper slips. I prefer the slips because it builds suspense as we tally up the votes. I choose a student who reads the names and I tally them up as they are read. We then have a discussion about who students voted for and what their reasoning was for doing so. The winner moves on to the next section of the bracket until they reach the championship. The first day consists of four different votes.
Art Madness: Day Two
On day two of Art Madness, I cover the second half of the bracket and crown the champion. We have to work a little bit quicker this day because there will be five total votes instead of four like the previous class. We once again work our way down to the final vote and crown the King or Queen! After the champ has been chosen, I reorganize the bracket to show how my other classes voted so students can see how similar/different their bracket is compared to others. I also create a Google Form that I share out on Facebook and to my staff so students can see how adults voted.
Now, I know the thought that is running through your head, “This is a great idea, Devon! But why couldn’t you tell us about this BEFORE March Madness?! Now I have to wait until next year!” No way! Don’t let that stop you. Kids will love this! This would be a great end-of-the-year activity to wind down the school year. You could even cover the artists that your students have learned about throughout the school year! Still not sold on it? I’ll GIVE you my ten contemporary female artists that I used this year, as well as a little ditty about each of them! And, if you keep your eye out, you might find a few of my projects that went with some of the artists (hint hint).
This Year’s Art Madness Contenders
Julie Mehretu
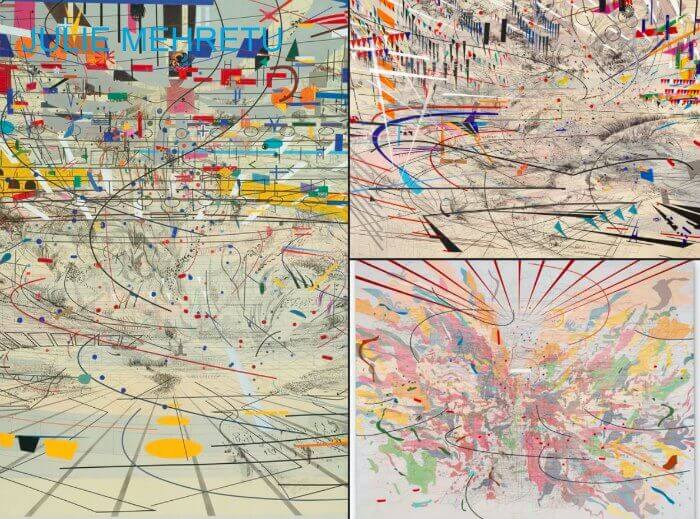
Julie is originally from Ethiopia but immigrated to the U.S. with her father when she was a child to escape the turmoil occurring in the area. Her work involves a lot of maps and architecture. However, she doesn’t paint an entire map or building, she chooses bits and pieces of them and paints them onto her enormous canvases. She paints layer upon layer of brightly colored lines and shapes that have a sense of movement and space that coalesce into one chaotically beautiful painting. As promised, here’s a project my 3rd graders did earlier in the year inspired by Julie.
Yayoi Kusama
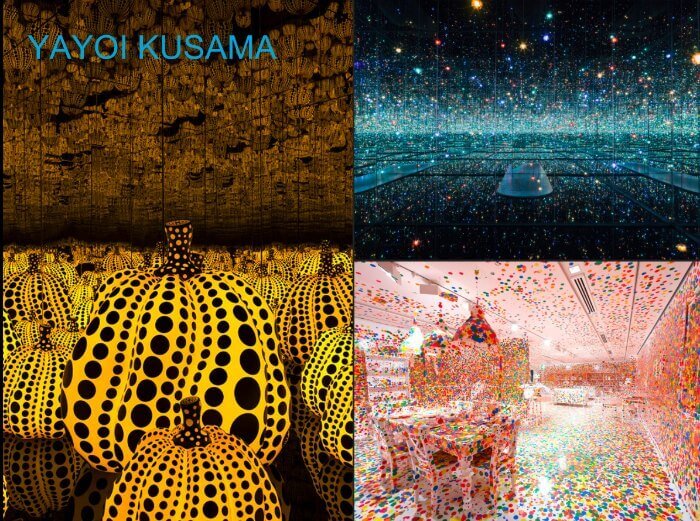
Yayoi is nicknamed the “Princess of Polka Dots” and rightfully so. Her works feature polka dots on EVERYTHING! My students are particularly drawn to her installation pieces. In her installations, she oftentimes uses mirrors that reflect off each other to make the rooms feel infinite. Their favorite installation though is her Obliteration Room. This room started out completely white. As people visited it, they were given stickers to place in the room wherever they wanted. My students were particularly drawn to the idea that Yayoi was giving everyone the chance to be an artist when interacting in this space. Yayoi was crowned the Queen of Art in one of my four classes. Looking for a good fall lesson? Here’s a Kusama pumpkin project!
Ursula von Rydingsvard
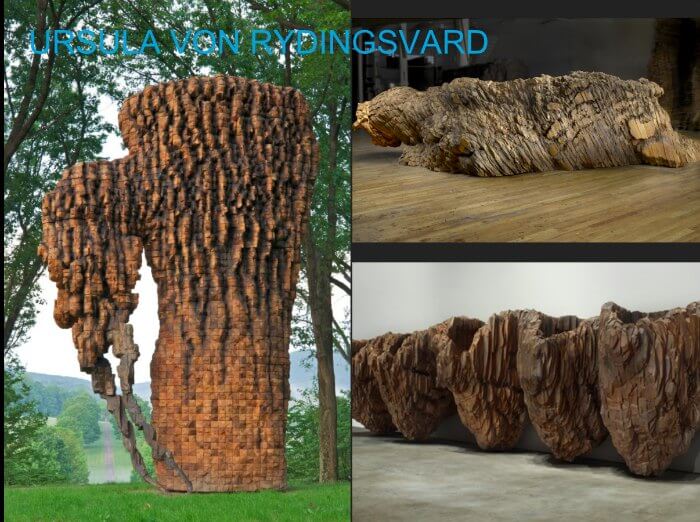
I had the chance to see Ursula present a mini-keynote at NAEA17. I first learned of her in college from an Art21 video. When I see Ursula’s monstrosities made of wood, the last artist that I picture making them is her. She is a small, petite, 75-year-old who makes HUGE sculptures from wood. After assembling the sculptures from small blocks of wood, she takes saws and grinders to the wood to alter the surface and create textures. Lastly, she rubs graphite all over the sculpture to stain it and give it an older look. Many of her artworks resemble otherworldly creatures.
Sandy Skoglund
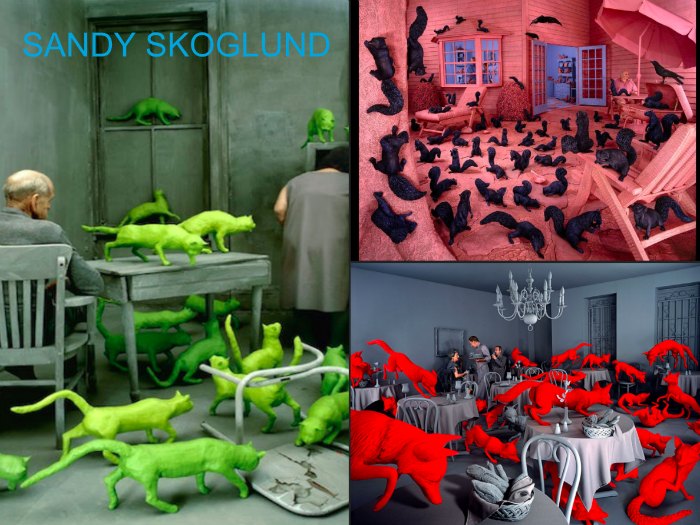
Sandy is a sculptor and a photographer. She creates an ordinary-looking background which is usually all one drab-ish looking color. She then repeats one thing, oftentimes an animal, over and over in her work. Usually, the animals are bright vivid colors, such as neon green cats or bright red foxes, that contrasts the background. Lastly, she stages actual people into her artwork and then photographs it. My students really liked Sandy’s work because it is so narrative. They liked that they could start to create stories about it in their heads. Sandy was crowned the Queen of Art in one of my four classes.
Swoon
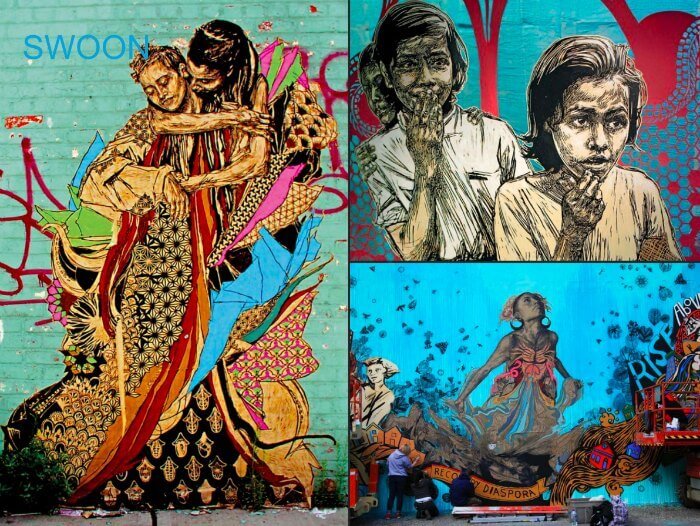
Swoon is a pretty well-known street artist who uses printmaking to make her work which she then wheat-pastes to walls. My students liked that her style of street art was a little less conventional than using a can of spray paint. Swoon’s life-sized woodcuts are inspired by the people she encounters in local neighborhoods. She really strives to make connections between her artwork and the people who view it.
Mademoiselle Maurice
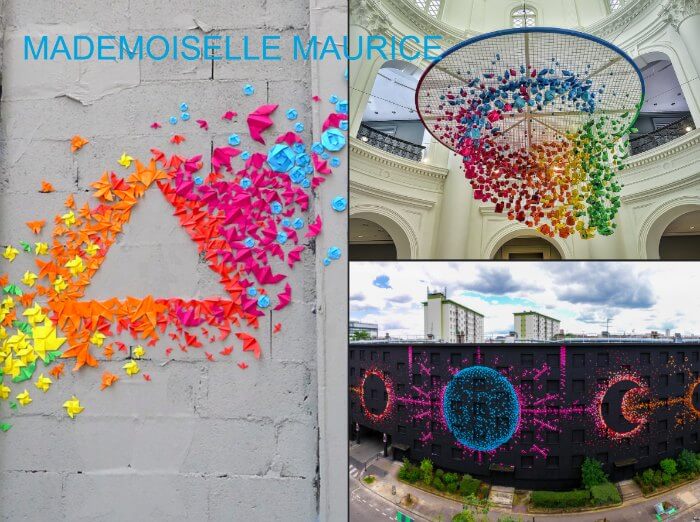
Speaking of non-traditional street artists, Mademoiselle Maurice is a French artist and unlike any other street artist I’ve seen! Her medium of choice is origami. She creates thousands of origami pieces that are often the same shape but vary in size. Her origami pieces are brightly colored and she does a great job of transitioning from one color to the next in larger than life gradations. Her work often uses negative space too to create shapes on walls as well. She was a hit with my classes due to her use of origami in her art, however, she was never crowned the Queen of Art.
Heather Hansen
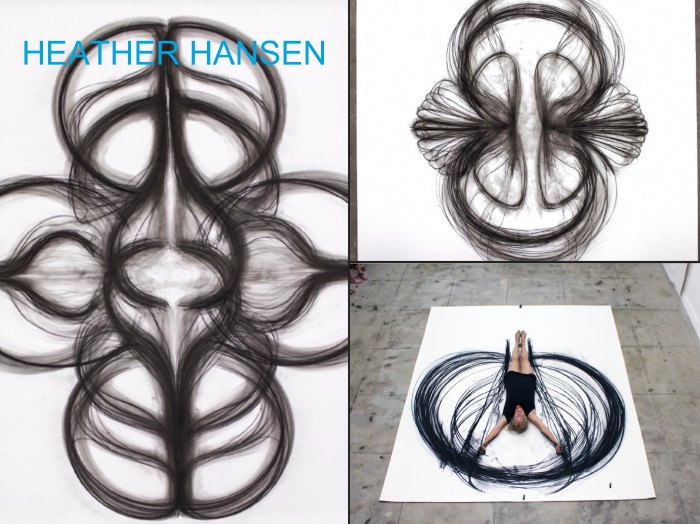
Heather is not only an artist but also a dancer. This was something that caught the interest of many of the girls in my class because many are in dance classes themselves. Heather lays on a large sheet of paper with a piece of charcoal in each hand. She slowly and rhythmically moves her body about the paper in a mesmerizing dance that creates symmetrical works of art. For Heather, her art process is very thoughtful and meditative. Here’s a project I did with my kiddos that I snagged from Don Masse over at Shine brite zamorano!
Lina Iris Viktor
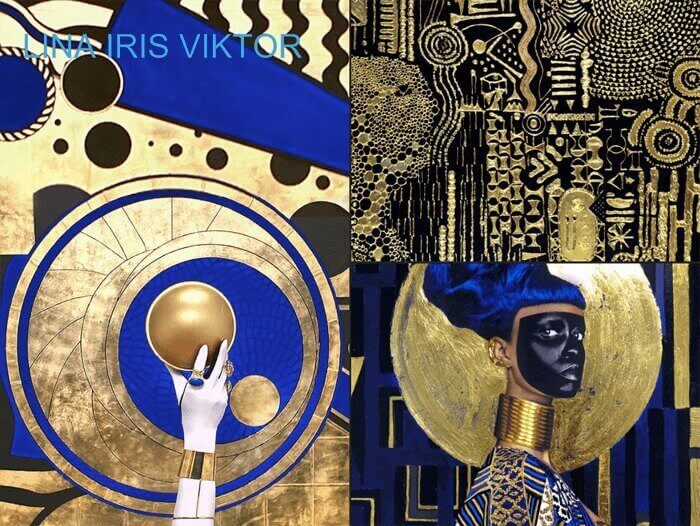
Lina’s work reminds me a lot of Gustav Klimt due to her use of 24k gold, as well as her geometric shapes and patterns. Her color palette is limited to black, occasionally white, 24k gold, and a very specific kind of blue called Majorelle Blue. She has been in the news lately because she is suing the rapper, Kendrick Lamar, for stealing her work in his latest music video called “All the Stars.” She was the ultimate Queen of Art this year winning two of the four classes! Lina was the last artist my students did a project based on before starting the Art Madness tournament, so that may have skewed the results a bit. Either way, I find her work amazing!
Maya Hayuk
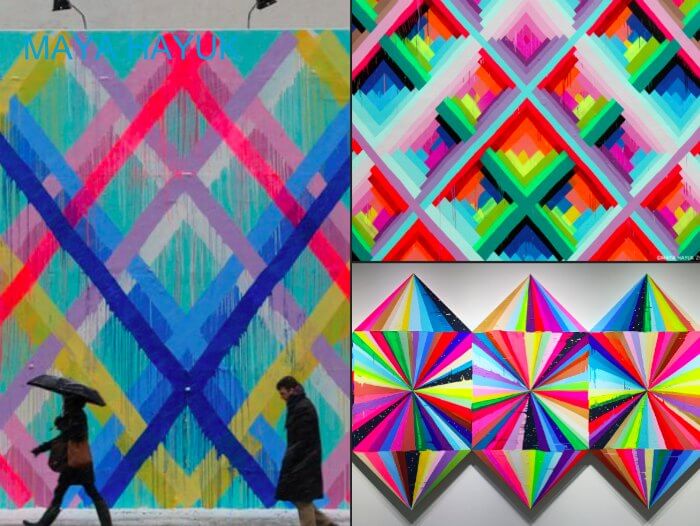
Maya’s work is bold, bright, and beautiful! She is a muralist who uses a lot of symmetry in her work. She thins out her paint so it is watery and semitransparent. As she paints, it drips down her artwork and previous layers of paint are revealed through the semitransparent streaks of paint. Her overlapping diagonal lines create a sense of space in her work. My students are really drawn to an idea that Maya has about her work. Maya believes that the darker our world gets each day, the brighter and brighter her work needs to become to cheer people up. Many of my girls were also inspired by the fact that she partnered with Billabong to create women’s swimsuits with her designs on them. My project on Maya is a great introductory project dealing with symmetry!
Amy Sherald
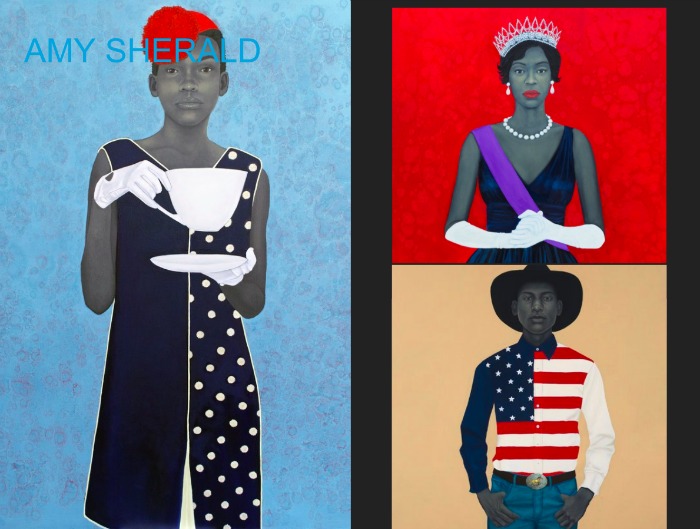
Amy is an African-American artist who makes portraits of other African-Americans. I find it interesting that she changes all of the skin-tones to a grey scale for her portraits. The skin is also beautifully rendered with highlights and shadows. To contrast the highly rendered people, she makes their clothing appear more flat with less detail. I find that contrast particularly striking. Her figures also usually have an item of flair with them such as a crown, white gloves, a boat, hat, etc. Amy was in the news recently for her awe-inspiring portrait of Michelle Obama for the National Portrait Gallery.

Devon Calvert is the art teacher at Harmony and Consolidated schools in Milton, WI. He believes art builds students’ problem-solving skills and perseverance. You can find out more about him and his art lessons on his blog, as well as Facebook and Twitter.

